Once you have created a booking calendar, the next step is to share it so you can enable customers to easily schedule time with you.
There are multiple ways of sharing your booking calendar: Embedding a standalone booking calendar on your website, sharing a link to it, or by pairing it with a chatbot, routing form, or booking hub, and publishing those.
NoteYour booking calendar needs to be published before you can share it. To publish, go into the builder, and click the Publish toggle at the top right-hand corner.
Share a link
You can share your booking calendar directly to a customer with a link. It will be displayed on a page which you can customize to match your branding.
To design your page and generate a link, follow these steps:
- In the booking calendar builder, click the Share a link tab.
- You can also share from the lobby. Click the Share button next to the booking calendar you want to share, then follow the steps from point 4 below. If you click Design your page, follow the points below from step 2.
- A page displaying a preview of your booking calendar will load, with a toolbar on the right (Figure 1) allowing you to customize the title, colors, and other features of the page. Here, you can:
- Choose the layout you prefer
- Choose a color gradient, or upload an image as the background
- Choose the color of the buttons on the page
- Add an image such as a logo or profile picture
- Write heading and body text
- Add text to be displayed in a footer, such as a disclaimer
- Once you are happy with the customizations you have made, click Save and then Share your page.
- In the pop up that opens (Figure 2) you can:
- Select that the linked booking calendar can only be used to schedule one meeting (by checking the One-time use box)
- Add UTMs to the link
- Download the link as a QR code as opposed to a URL
- Once you are happy with the URL settings, click Copy & close to copy the link, and paste it wherever you would like the share the link.
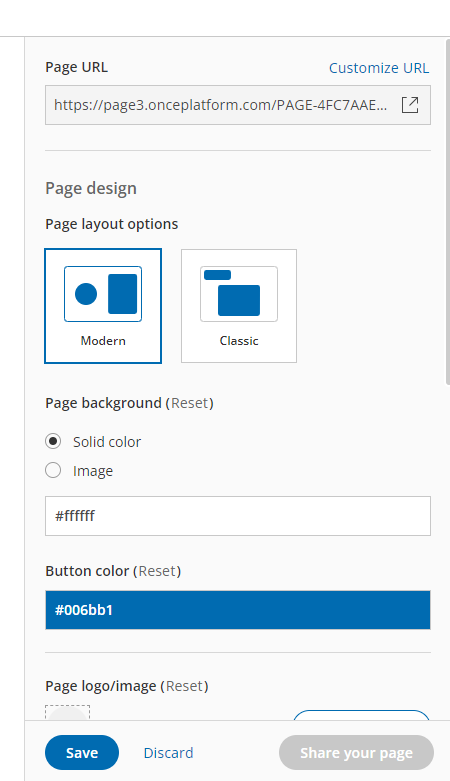 Figure 1: The toolbar allowing customization of your booking calendar when sharing with a link
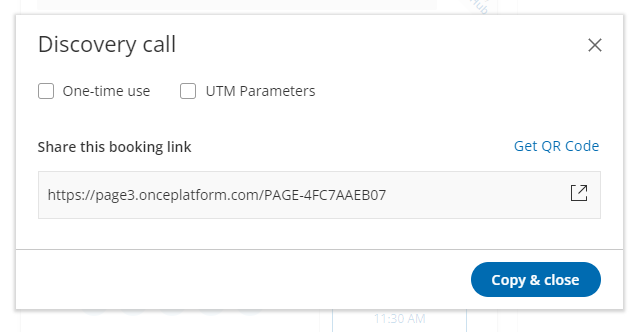 Figure 2: Copying the link to your booking calendar
Prepopulating booking calendar answers
When you share a booking calendar with a link, you can add parameters to the URL. These will provide information about your customer which will be automatically displayed in the booking calendar when they open it. Prepopulating booking calendar answers allows you to streamline your customers' experience when scheduling time with you. You can prepopulate a booking calendar with a customer's name and email address.
How to prepopulate booking calendar answers
- Get the URL for the booking calendar you want to share.
- Paste it somewhere you can edit it, like an email, or text editor.
- To begin adding parameters, add a "?" to the end of the link.
- Use "%20" to add a space between words.
- A variable is the type of information, and the specific information you want to add is a value.
- Immediately after that, add the following variables and values you'd like to use:
- Name: E.g.: name=Mike%20Smith
Fills the customer's full name in the booking calendar. - Email: E.g.: email=MikeSmith@example.com
Fills in the customer's email address in the booking calendar.
- Name: E.g.: name=Mike%20Smith
Once you've added in the relevant variables, copy the new link, and share it as usual. The information that you added will appear in the booking calendar when your customer opens it.
Embed on website
You can embed your booking calendar in your website, providing an easy way for customers to book with you on your own page.
Website embedding is available to both types of OnceHub users, although member users can only embed booking calendars of which they are the sole host, whereas admins can embed any booking calendar on their account.
Your booking calendar's color palette is customizable, meaning that the color of the buttons and background of your booking calendar can be changed to fit the theme of your website.
To share your booking calendar by embedding it into a website, follow these steps:
- Open the booking calendar which you would like to share.
- From the top menu, click the Share button.
- You can also share from the lobby. Click the Share button next to the booking calendar you want to share, then Embed on website, then follow the instructions.
- Select the color you'd like the booking calendar's theme to be, and then click Get the code.
- Paste the code into the relevant section on your website.
Now your booking calendar is embedded, and your customers can schedule time with you directly from your website.
Use chatbots for scheduling
One method of deploying your booking calendar is by pairing it with a chatbot.
Open or create a chatbot, and on the right-hand menu titled Add interaction, scroll down to the actions heading, where you will see Booking calendar. Drag this interaction to where you want it to appear in your routing form. Select which booking calendar you want to appear here by using the drop-down menu on the right.
Using a chatbot with your booking calendar allows you to route your customers more effectively by asking qualifying questions, and directing them to the relevant calendar. You can add multiple booking calendars to a chatbot, to enable more accurate routing in one spot.
Learn how to create and route chatbots.
Use routing forms for scheduling
One method of deploying your booking calendar is by pairing it with a routing form.
Open or create a routing form, and on the right-hand menu titled Add interaction, scroll down to the actions heading, where you will see Booking calendar. Drag this interaction to where you want it to appear in your routing form. Select which booking calendar you want to appear here by using the drop-down menu on the right.
Using a routing form with your booking calendar allows you to route your customers more effectively by asking qualifying questions, and directing them to the relevant calendar. You can add multiple booking calendars to a routing form, to enable more accurate routing in one spot.
Learn how to create and route routing forms.
Use a booking hub for scheduling
Booking hubs enable you to cater to many scenarios with a simple solution: Visitors can select from multiple services or team members in one place.
Booking hubs function by allowing you to combine multiple booking calendars for display to your customers. This makes scheduling with booking calendars more versatile and allows you to cater for diverse scheduling scenarios.
Learn more about creating and sharing a booking hub.