You can automatically redirect your customers to different web pages after they schedule, reschedule or cancel a booking.
In this article, you'll learn about the automatic redirect settings.
Configuring the automatic redirect
You can configure the automatic redirect in the booking form and redirect section. The location of the booking form and redirect section depends on whether or not your booking page has any event types associated with it.
- For booking pages associated with event types, go to booking pages in the bar on the left → select the relevant event type → booking form and redirect section.
- For booking pages not associated with event types, go to booking pages in the bar on the left → select the relevant booking page → booking form and redirect section.
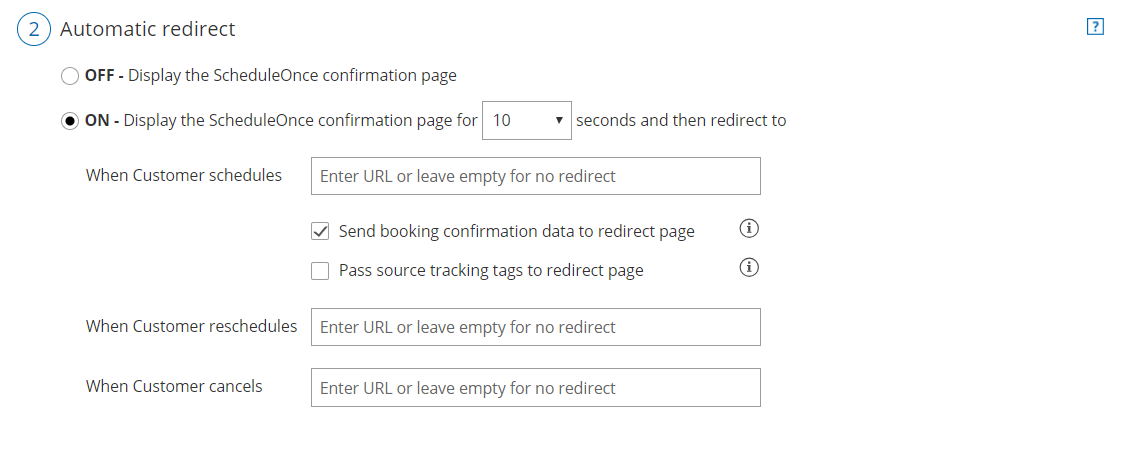 Figure 1: Automatic redirect settings
Important
You can change the location of the Booking form and redirect section to be located on the Booking page or the Event type. To set the location, go to Booking pages in the bar on the left → Event types pane → action menu (three dots) → Event type sections. Learn more about Event type sections
Automatic redirect set to OFF
This is the default option. When Automatic redirect is set to OFF, the Customer will see the Booking confirmation after they schedule, reschedule or cancel a booking.
This page gives the Customer information about the booking that they've just made. It also gives the Customer the option to download the meeting’s ICS file into their calendar.
If you're working in Booking with approval mode, the confirmation page will display the requested times that the Customer gave as options. If you're using Session packages, the meeting time for every session will be displayed.
Automatic redirect set to ON
When Automatic redirect is set to ON, the Customer will be automatically redirected from the Booking confirmation page to the URL of your choice.
You can redirect immediately after the schedule, reschedule or cancellation process is completed, or choose to have the Customer stay on the confirmation page for a short amount of time and then be redirected.
You can also choose to redirect to different pages when a Customer makes a new booking, reschedules or cancels. Redirect will only take place if a URL was provided.
Note
Automatic redirect can also be used when the page is embedded.
Using Automatic redirect
If enabled, Automatic redirect takes effect after the Customer completes a scheduling, rescheduling or cancellation process.
By default, all booking processes end on the confirmation page. Automatic redirect allows you to skip this confirmation page completely, or show it for a limited time and then redirect to a page of your choice.
You can also pass source tracking tags to the redirect page, or redirect booking confirmation data to a custom confirmation page.
Automatic redirect is used for several purposes:
- Align with your business process: After scheduling, Customers can fill out a form or perform additional steps.
- Measure your campaign effectiveness: You can accurately measure traffic and funnel conversion by adding Google analytics, Facebook pixel, Adwords, or other tracking mechanisms to the redirect target pages.
- Brand your "thank you" pages: You can design and create your own "thank you" pages. These can be shown to Customers either after the Booking confirmation page or instead of it.