The OnceHub connector for Salesforce allows you to map any OnceHub System field or Custom field to Salesforce fields. If you want to add an additional layer of Salesforce fields update logic, you can create Salesforce Workflow Rules.
In this article, you'll learn how to create Workflow Rules based on OnceHub data. We'll use a sample scenario in which you update the Lead: Event Booked checkbox and the Lead: Lead Status picklist when a Customer makes a booking or reschedules a booking.
Requirements
To update Salesforce fields when the Customer schedules or reschedules an event, you will need:
- A OnceHub Administrator.
- A Salesforce Administrator for your organization.
- An active connection to your Salesforce API User.
Let’s assume that the Lead Status field includes the Working – Contacted and the Open – Not contacted options. To create the Salesforce Workflow Rules, you'll need to follow these steps:
- Create an Event Status text Custom field for the Lead object and add it to the Lead Page Layout.
- Create an Event Booked checkbox Custom field (unchecked as default) for the Lead object and add it to the Lead Page Layout.
- Map the OnceHub Status field to the Lead: Event Status field.
- Create the Workflow Rules.
Creating an Event Status text Custom field
- Sign in to Salesforce as your API user.
- Go to the Setup page.
- In the Platform Tools section, go to Objects and Fields -> Object Manager (Figure 1).
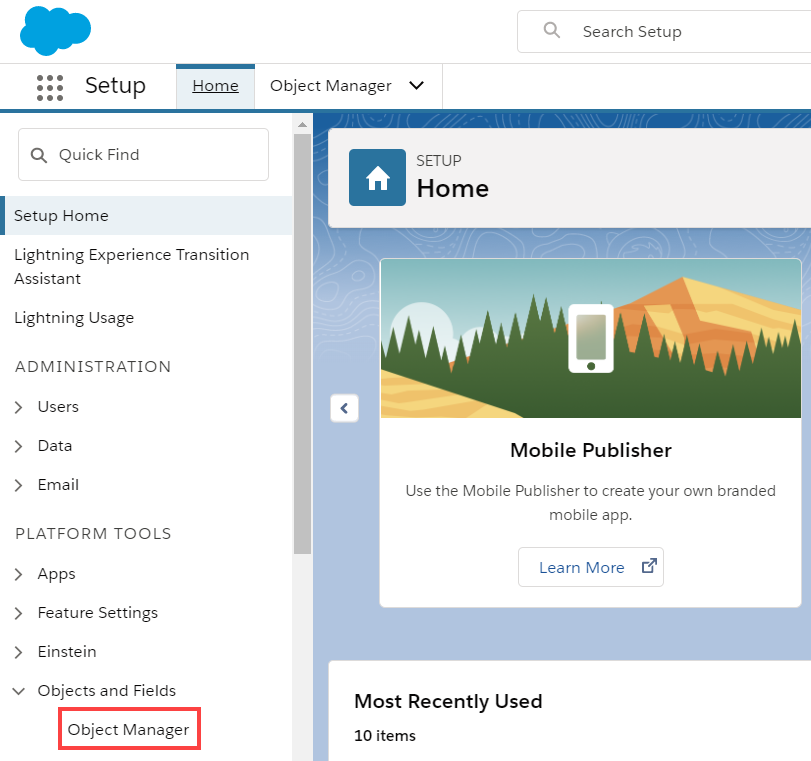 Figure 1: Object Manager in the Objects and Fields menu
- In the Object Manager list, select Lead (Figure 2).
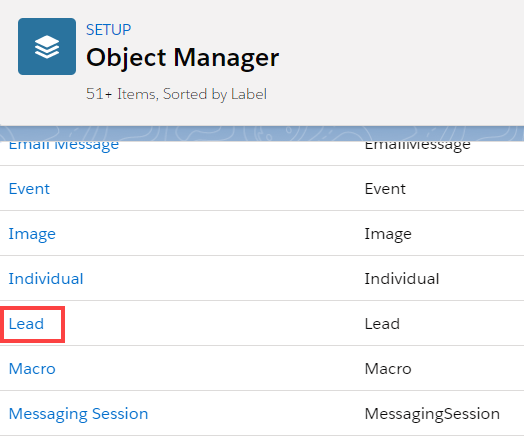 Figure 2: Lead in the Object Manager list
- Select Field & Relationships -> New (Figure 3).
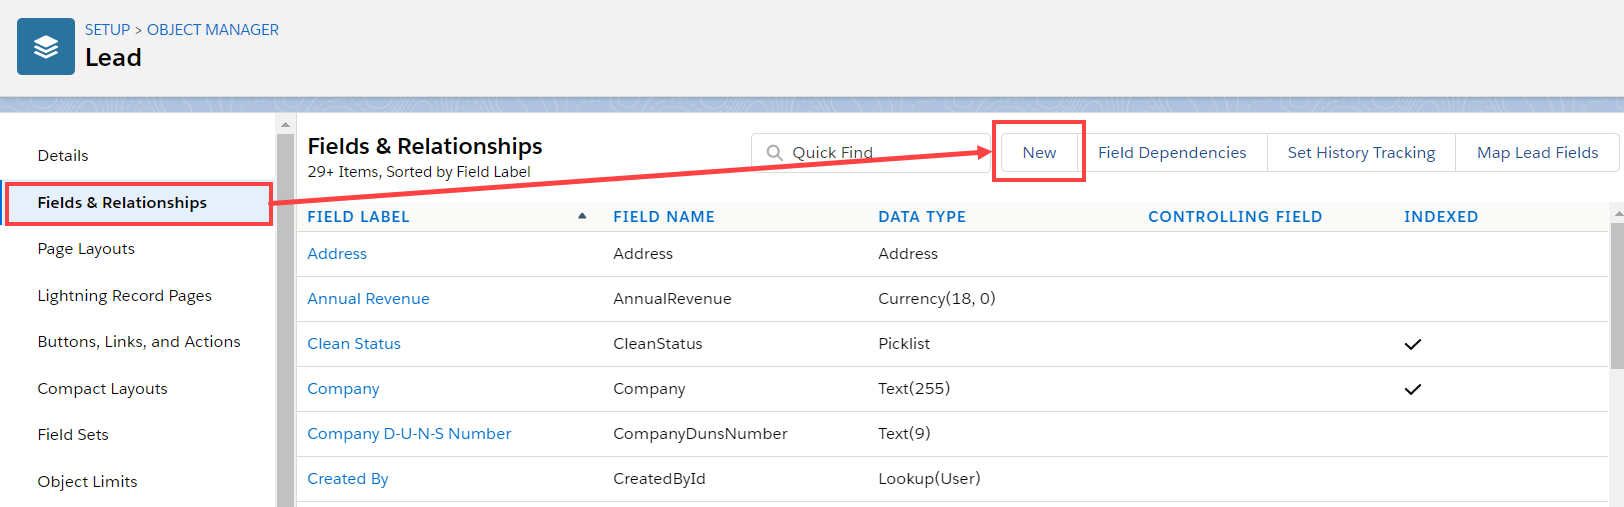 Figure 3: Fields & Relationships
- In the New Custom Field pane, select Text and click Next (Figure 4).
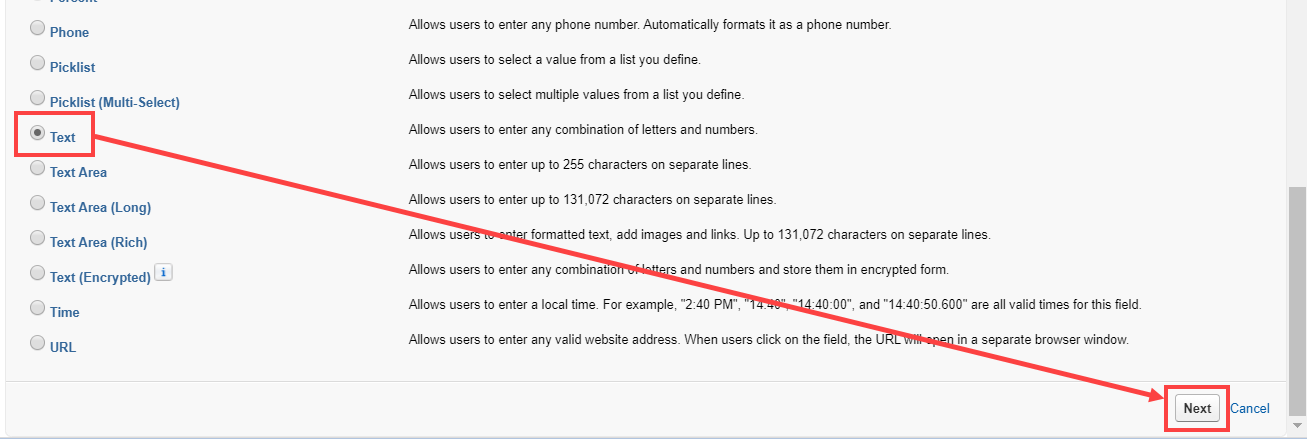 Figure 4: Text field
- In Step 2: Enter the details, enter the following information (Figure 5). Add a description if required, then click Next.
- Field label: Event Status
- Length: 40
- Field Name: Event_Status
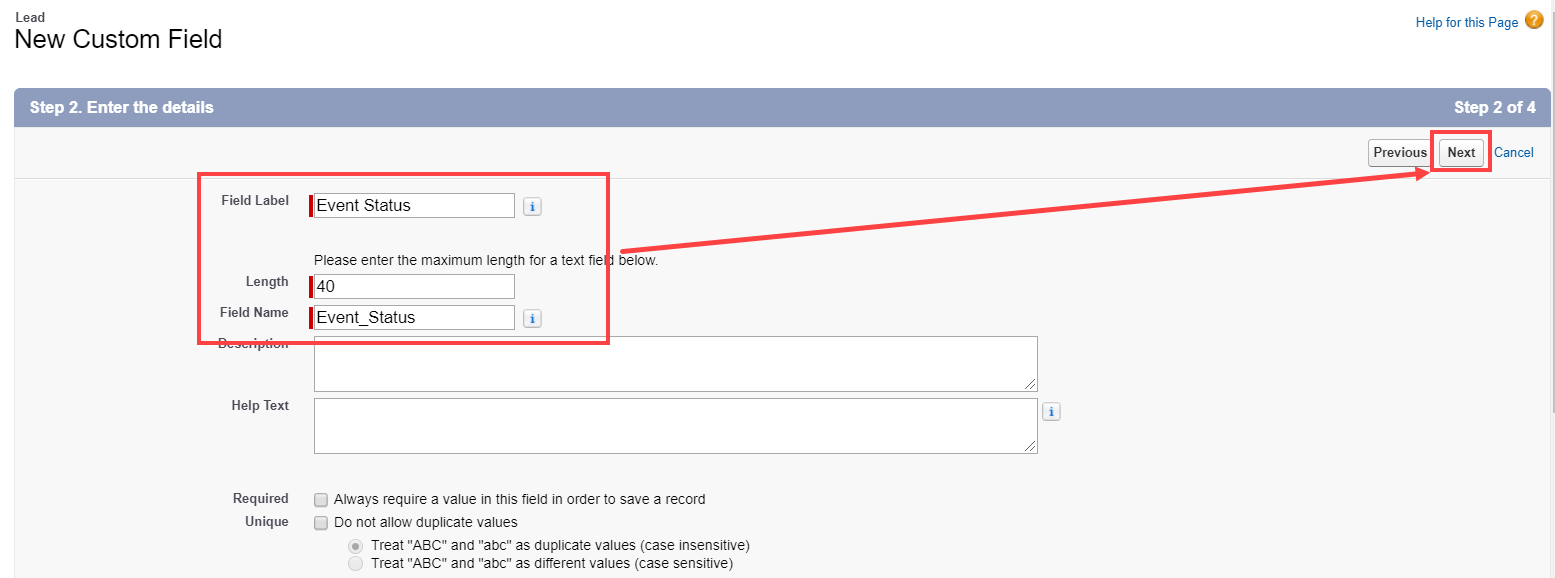 Figure 5: Step 2 Enter the details
- In Step 3, click Next.
- In Step 4, click Save.


Your Event Status text Custom field is now created and is added to the Lead Page Layout.
Creating an Event Booked checkbox Custom field
- Follow steps 1–5 from Creating an Event Status text Custom field above.
- In the New Custom field pane, select Checkbox and click Next (Figure 6).
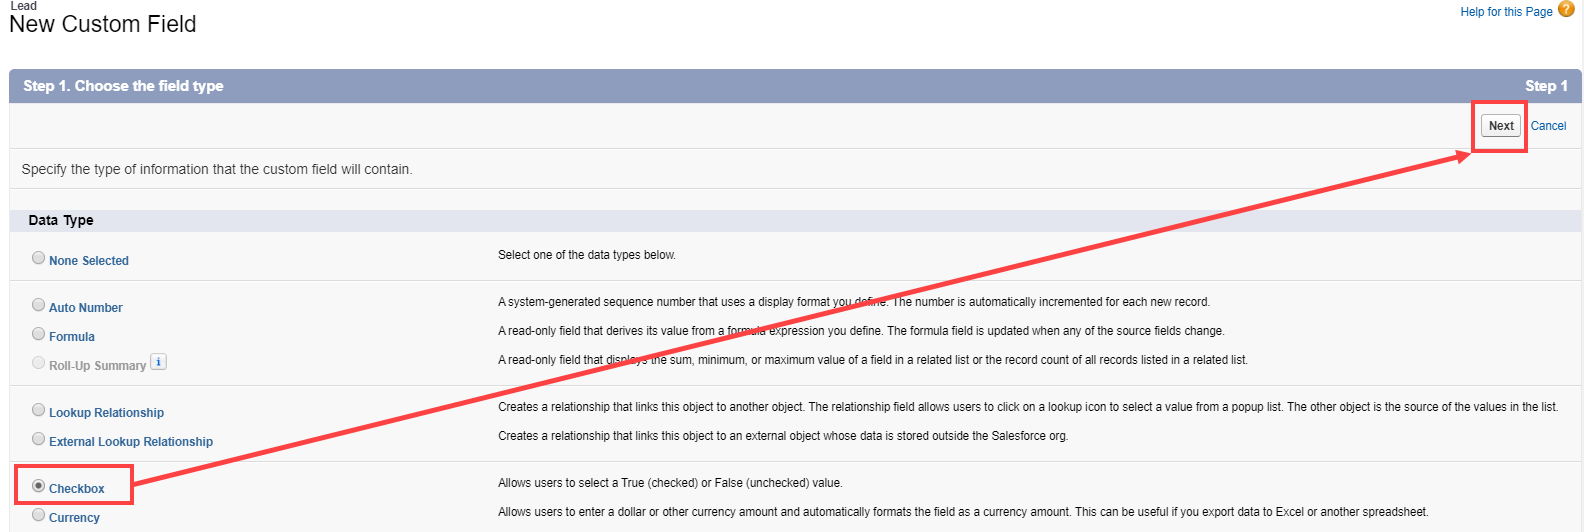 Figure 6: Checkbox
- In Step 2: Enter the details, enter the following information (Figure 5). Add a description if required, then click Next.
- Field label: Event Booked
- Default value: Unchecked
- Field Name: Event_Booked
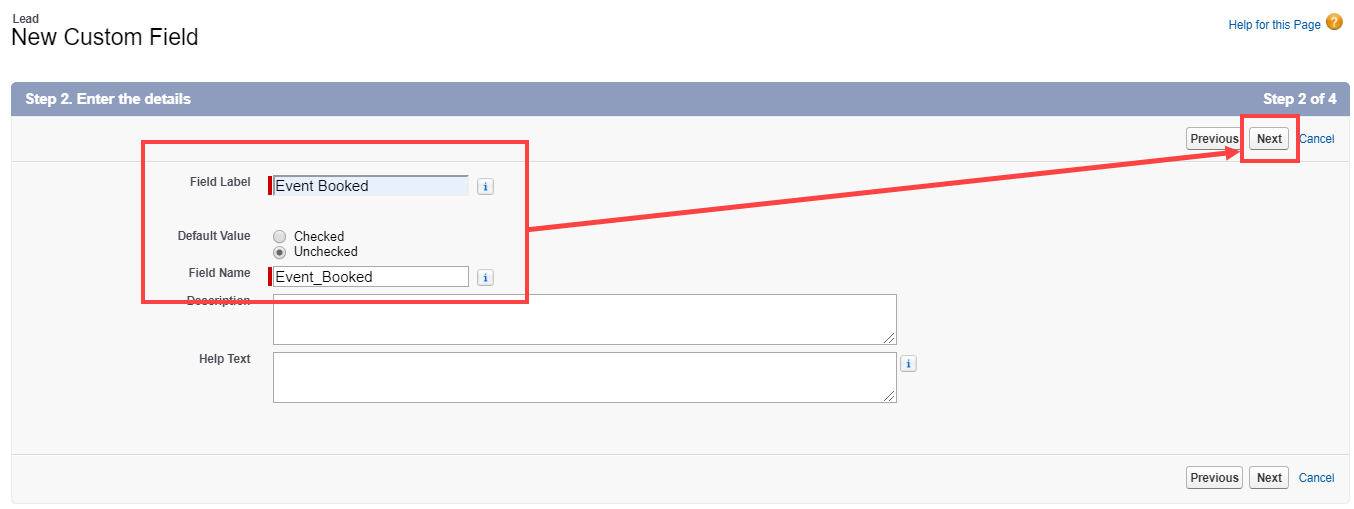 Figure 7: Step 2 Enter the details
- In Step 3, click Next.
- In Step 4, click Save.


Your Event Booked checkbox Custom field is now created and is added to the Lead Page Layout.
Mapping the OnceHub Status field to the Lead Event Status field
- Select your profile picture or initials in the top right-hand corner → Profile settings → CRM.
- In the Salesforce box, click Setup.
- In the Salesforce connector setup, go to the Field mapping tab.
- At the bottom left of the table, click Add OnceHub fields (Figure 8). The OnceHub field list includes System fields and Custom fields organized by categories.
- The Add OnceHub fields pop-up will open
- Use the Filter by drop-down menu to filter by Booking data.
- Check the Status checkbox.
- Click Add fields.
NoteIf you want to make the Workflow Rule specific to a Booking page or Event type, you can also map the OnceHub Booking page label or Event type name to specific Lead Custom fields. The Booking page label or Event type name can be used to refine the Salesforce Workflow rule that is triggered when a booking is made.
- For the newly added Status field, select Lead from the first drop-down menu and select Event Status (Event_Status__c) from the second drop-down menu (Figure 8).
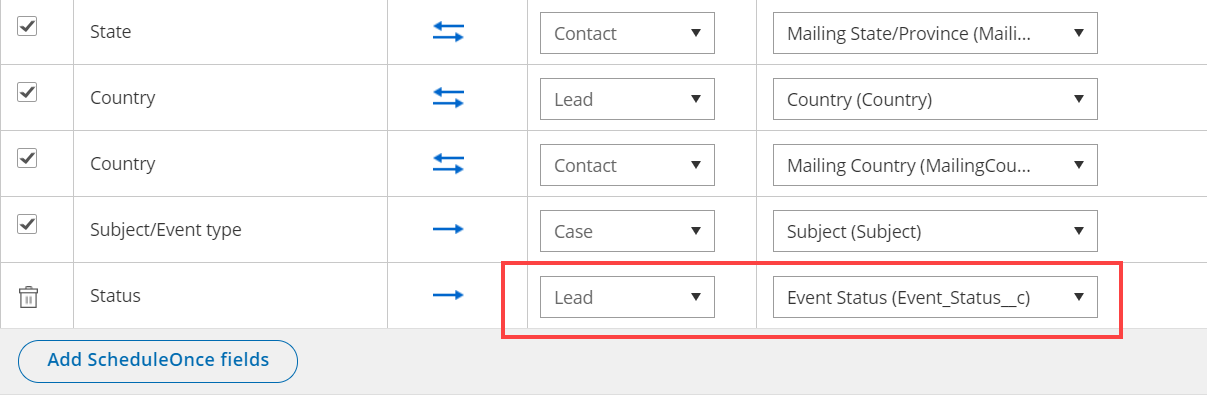 Figure 8: Map the Status field
- Click the Save button or Save and Continue if you have completed mapping all fields.

Creating Workflow Rules in Salesforce
You can automate the update of many field records using workflow rules. We will create two workflow rules:
- Workflow rule 1 checks the Event Booked checkbox and sets the Lead Status to Working - Contacted when the event is scheduled or rescheduled by Customer
- Workflow rule 2 unchecks the Event Booked checkbox and sets the Lead Status to Open – Not Contacted when the event is not scheduled or rescheduled by Customer
To create Workflow rules, follow the steps below:
- Sign in to Salesforce.
- In your Salesforce Setup page, go to Platform tools -> Process Automation.
- Select Workflow Rules (Figure 10).
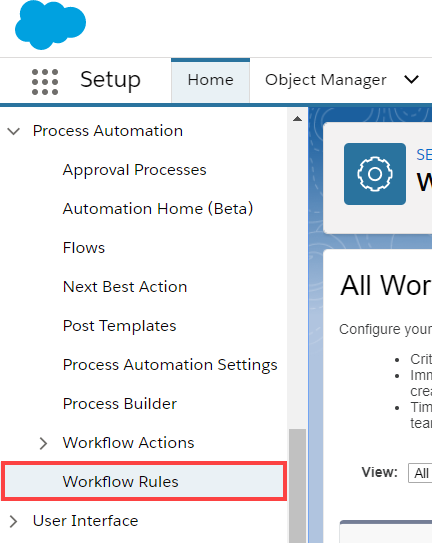 Figure 9: Workflow Rules
- Click New Rule.
- From the Object drop-down, select the object to which the rule will apply. In our example, select Lead.

Creating Workflow Rule 1
- On the New Workflow Rule page in Salesforce, fill out the following information and click Save & Next (Figure 11).
- Rule Name: Update Lead fields when event is scheduled or rescheduled by Customer
- Rule description: The Rule checks the Event Booked checkbox and sets the Lead Status to Working - Contacted when the event is scheduled or rescheduled by Customer.
- Evaluate the rule when a record is: created, and every time it’s edited
- Rule Criteria: Run this rule if the criteria are met:
- Lead: Event status equals Scheduled
- Lead: Event status equals Rescheduled by Customer
- Advance filter logic: 1 OR 2
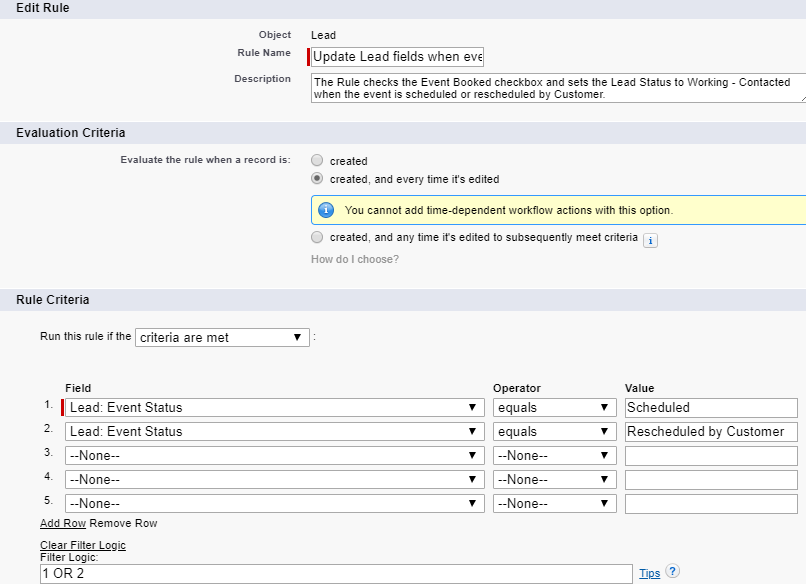 Figure 10: Update Lead fields when event is scheduled or rescheduled by Customer
- On Step 3: Specify Workflow Actions, click Add Workflow Action.
- Select New Field Update and add the following information (Figure 12):
- Name: Check the Event Booked checkbox automatically
- Unique name: Check_checkbox
- Field to update: Event Booked
- Re-evaluate Workflow Rules after Field Change: Checked
- Checkbox Options: True
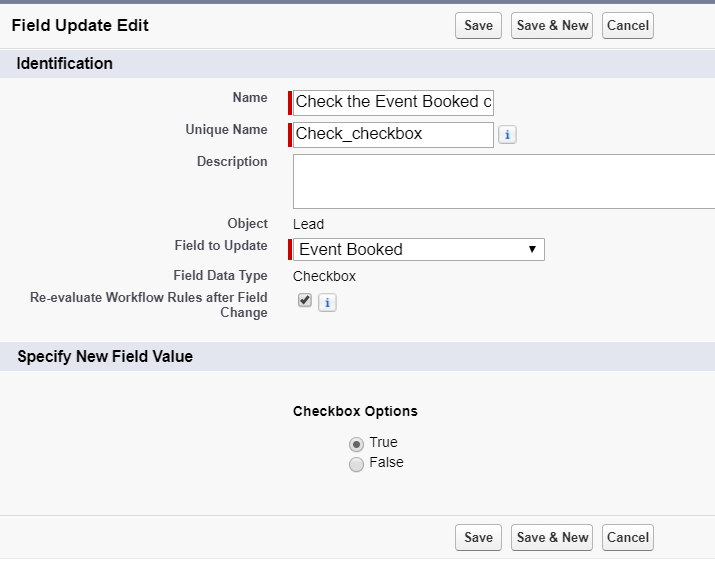 Figure 11: Automatically check the Event Booked checkbox
- Click Save & New.
- Add the following information (Figure 13):
- Name: Update the Lead Status picklist to Working - Contacted
- Unique name: Update_the_Lead_Status_picklist
- Field to update: Lead Status
- Re-evaluate Workflow Rules after Field Change: Checked
- Picklist Option > A specific value: Working – Contacted
 Figure 12: Update the Lead Status picklist to Working - Contacted
- Click Save.
- Click Done.
- On the Workflow Rules page, click Activate to activate the rule.


Creating Workflow Rule 2
- On the New Workflow Rule page in Salesforce, fill out the following information and click Save & Next.
- Rule Name: Uncheck the Event Booked checkbox automatically when a booking is not scheduled or rescheduled by Customer.
- Rule description: The Event Booked checkbox will be automatically unchecked on the Lead Page Layout when an event is not scheduled or rescheduled by the Customer for that record.
- Evaluate the rule when a record is: created, and every time it’s edited
- Rule Criteria: Run this rule if the following criteria are met:
- Lead: Event status not equal to Scheduled
- Lead: Event status not equal to Rescheduled by Customer
- Advance filter logic: 1 OR 2
- On Step 3: Specify Workflow Actions , click Add Workflow Action.
- Select New Field Update, add the following information:
- Name: Uncheck the Event Booked checkbox automatically when a booking is made.
- Unique name: Uncheck_the_Event_Booked_checkbox
- Field to update: Event Booked
- Re-evaluate Workflow Rules after Field Change: Checked
- Checkbox Options: False
- Click Save & New.
- Add the following information:
- Name: Change the Lead Status picklist to Open - Not Contacted
- Unique name: Change_the_Lead_Status_picklist
- Field to update: Lead Status
- Re-evaluate Workflow Rules after Field Change: Checked
- Picklist Option > A specific value: Open - Not contacted
- Click Save.
- Click Done.
- On the Workflow Rules page, click Activate to activate the rule.
You’re all set! You can now create a test booking in OnceHub to view how the Workflow Rules update your records when a booking is made.