When booking appointments is part of your email marketing campaigns, optimizing your booking rates becomes critical. In this article, you'll learn how to configure Salesforce Campaigns so that you track both bookings made, and more importantly, booking invitations that were missed or ignored. By tracking missed bookings, you'll be able to retarget them and increase the overall booking rates for your campaign.
Note For security and privacy reasons, using CRM record IDs to skip or pre-populate the Booking form is not compatible with collecting data from an embedded Booking page or redirecting booking confirmation data.
Requirements
To update Salesforce fields when the Customer schedules or reschedules an event, you must:
- Be a OnceHub administrator.
- Be a Salesforce Administrator for your organization.
- Have an active connection to your Salesforce API User.
Let’s assume that the Lead Status field includes the Working – Contacted and the Open – Not contacted options. To configure Salesforce Campaigns so that you can track both bookings made and booking invitations that were missed or ignored, you will also need to do the following:
- Create an Event Status text Custom field for the Lead object and add it to the Lead Page Layout.
- Map the OnceHub Status field to the Lead Event Status field.
The Event Status Custom field is used as a criteria to manage your campaign’s Lead members.
Note When multiple events are booked for the same Lead, the Event Status custom field represents the last event status update.
Setting up Salesforce Campaigns to retarget missed bookings
Salesforce Campaigns enables you to automatically trigger the missed bookings campaign. For this example, let's look at a lead qualification use case, whereby you want to send an email broadcast to a List of unqualified leads, inviting them to book a discovery call.
Tag leads that DID make a Booking
- Sign in to Salesforce.
- Go to the Sales app.
- Click the Campaign tab and click New (Figure 1).
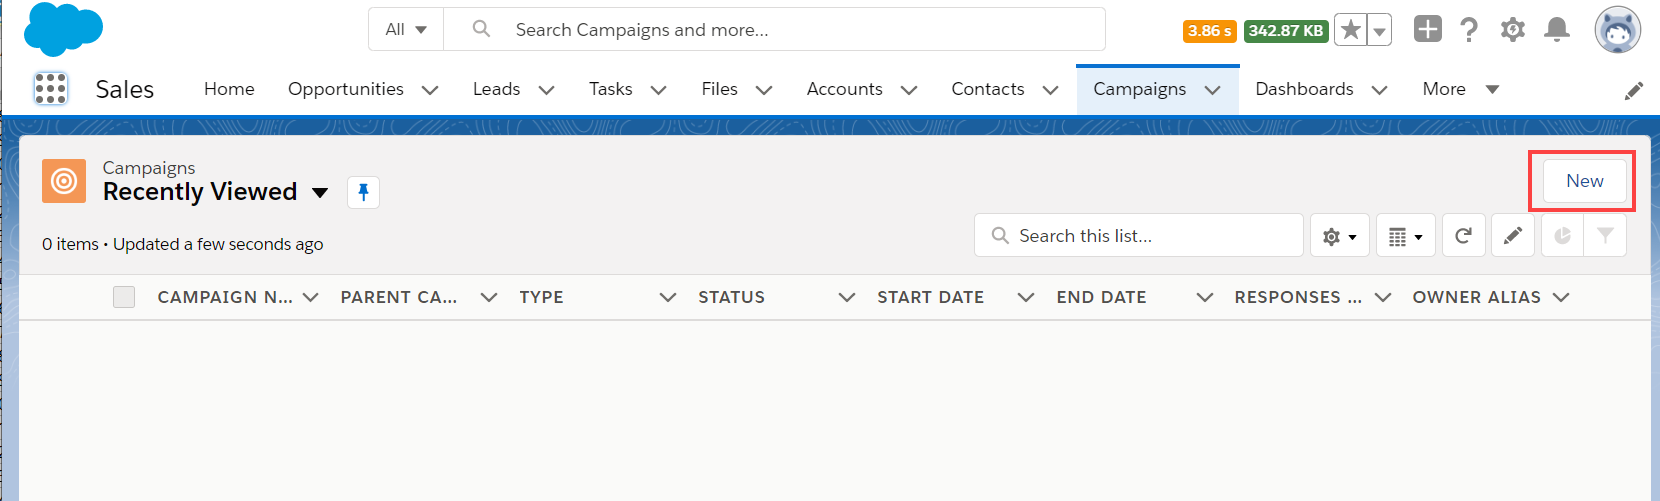 Figure 1: Create a new Campaign
- Enter "Booked" as the name for the campaign.
- In the Type drop-down menu, select Email.
- Check the Active checkbox.
- Click Save.
- Click the Leads tab.
- Click the gear icon and select New from the List View Controls drop-down menu (Figure 2).
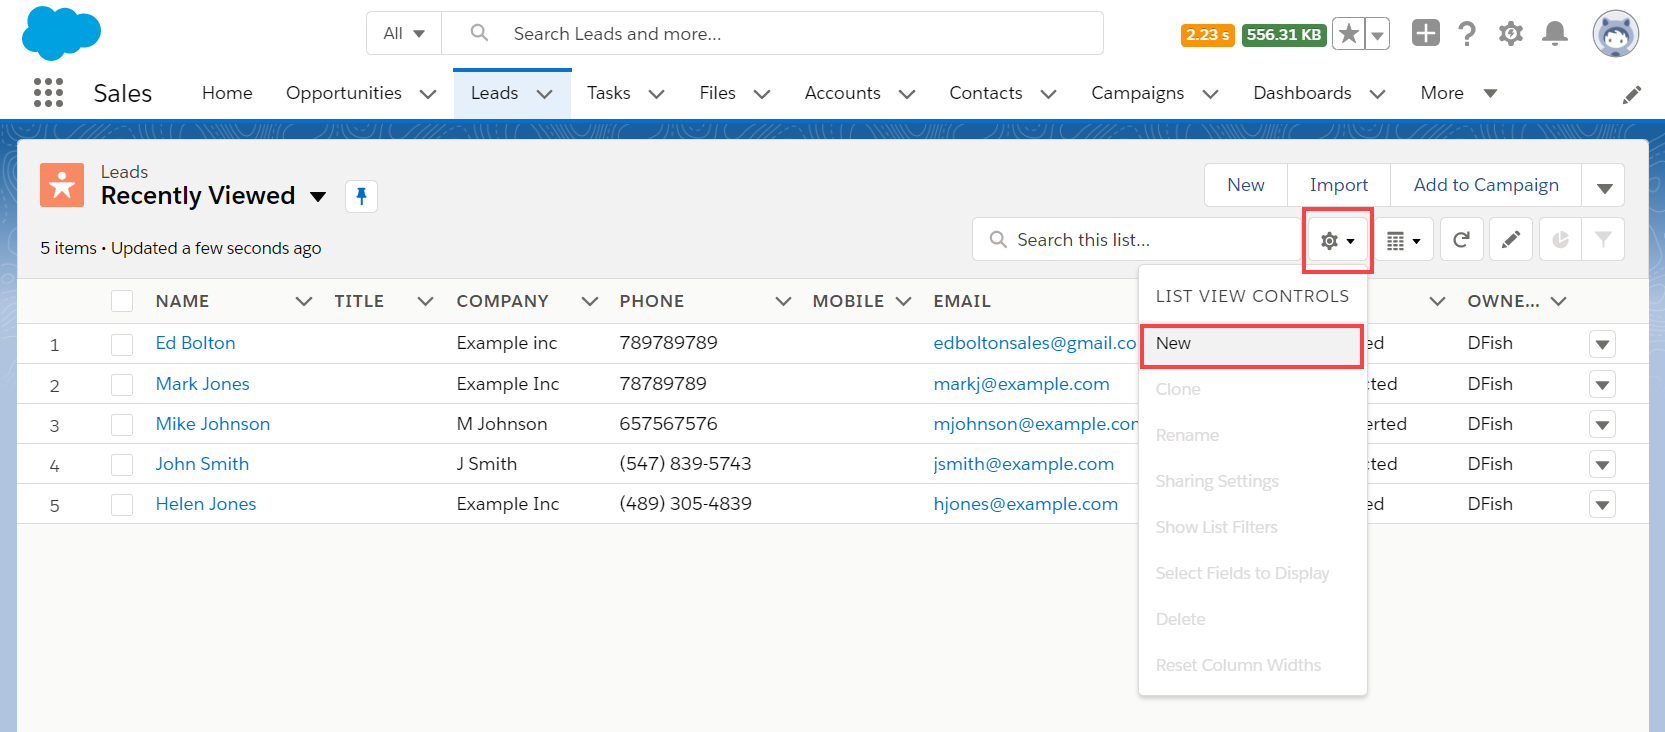 Figure 2: List View Controls
- In the New List View pop-up, give the list a name and select who can view this list (Figure 3).
 Figure 3: New List View pop-up
- In the Filters sidebar, click Add Filter (Figure 4).
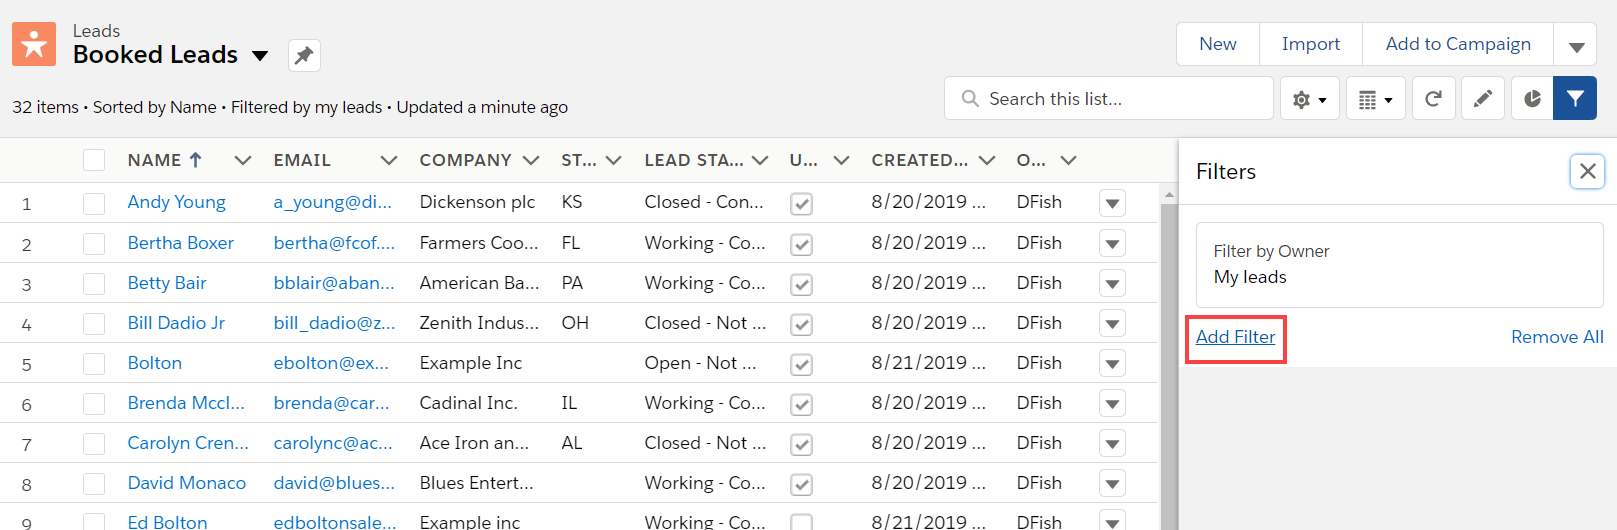 Figure 4: Add Filter
- From the Field drop-down menu, select Event Status.
- From the Operator drop-down menu, select Contains.
- In the Value field, add "Scheduled" (Figure 5). Click Done.
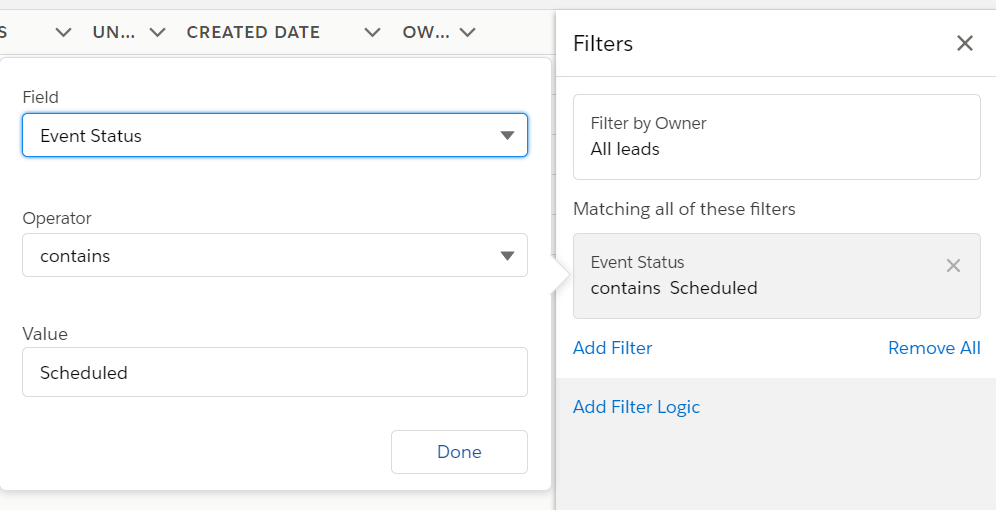 Figure 5: Event Status contains Scheduled
- Add another filter and select contains from the Operator drop-down menu. This time, in the Value field add "Rescheduled" and click Done.
- Click Add Filter Logic.
- Change the Filter Logic to 1 OR 2 (Figure 6).
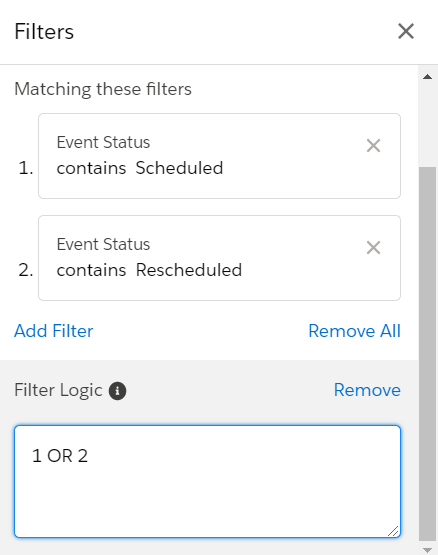 Figure 6: Edit Filter Logic
- Click Save. You will now see a list of any Leads that match the criteria.
- Click the checkbox at the top of the list to select all of the Members in this Filter View (Figure 7). Click the Add to Campaign button.
 Figure 7: Select Members
- In the Add to Campaign pop-up, select the campaign you created (Figure 8).
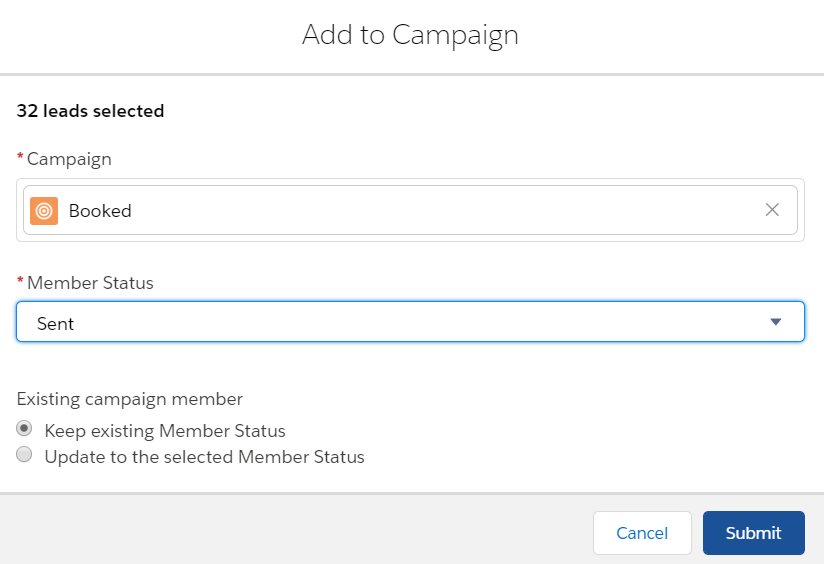 Figure 7: Add to Campaign pop-up
- Click Submit.


Retarget leads that DID NOT make a Booking
- Go to the Sales app.
- Click the Campaign tab and click New.
- Enter "Retarget Missed Bookings" as the name for the campaign. This campaign will target those who did not make a booking from the first campaign.
- Check the Active checkbox.
- In the Type drop-down menu, select Email.
- Set the Start Date to start automatically several days after the initial marketing campaign was run.
- Click Save.
- Click the Leads tab. We will create a list of the members that do NOT belong to the Booked Leads group. This group will contain all those who have received the initial email and didn’t open, click or made a booking.
- Click the gear icon and select New from the List View Controls drop-down menu.
- In the New List View pop-up, give the list a name and select who can view this list (Figure 8).
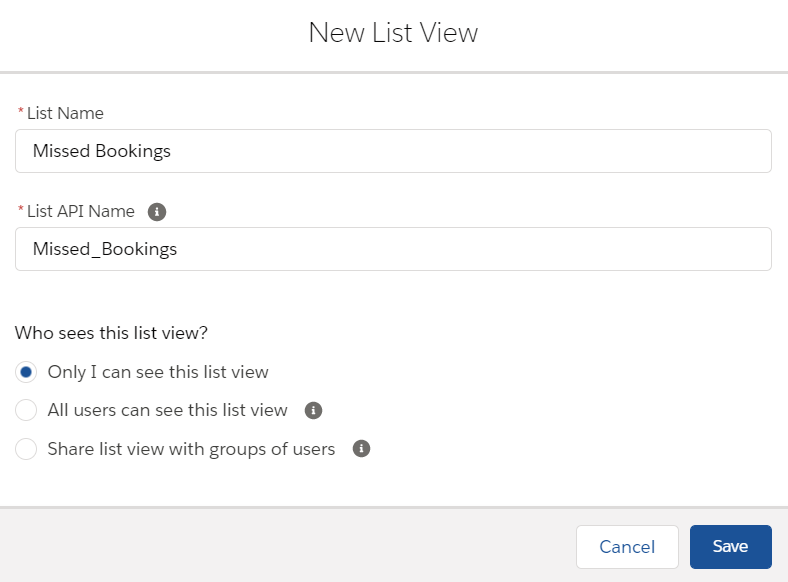 Figure 8: New List View pop-up
- In the Filters sidebar, click Add Filter.
- From the Field drop-down menu, select Event Status.
- From the Operator drop-down menu, select does not contain.
- In the Value field, add "Scheduled" (Figure 9). Click Done.
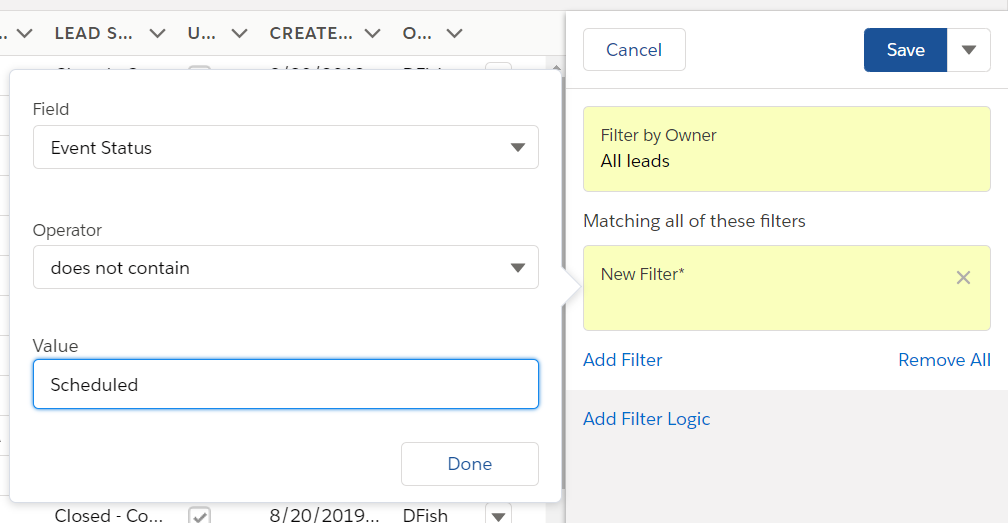 Figure 9: Event Status does not contain Scheduled
- Add another filter and select Does not contain from the Operator drop-down menu. This time, in the Value field add "Rescheduled" and click Done.
- Click Add Filter Logic.
- Change the Filter Logic to 1 OR 2.
- Click Save. You will now see a list of any Leads that match the criteria.
- Click the checkbox at the top of the list to select all of the Members in this Filter View (Figure 10). Click the Add to Campaign button.
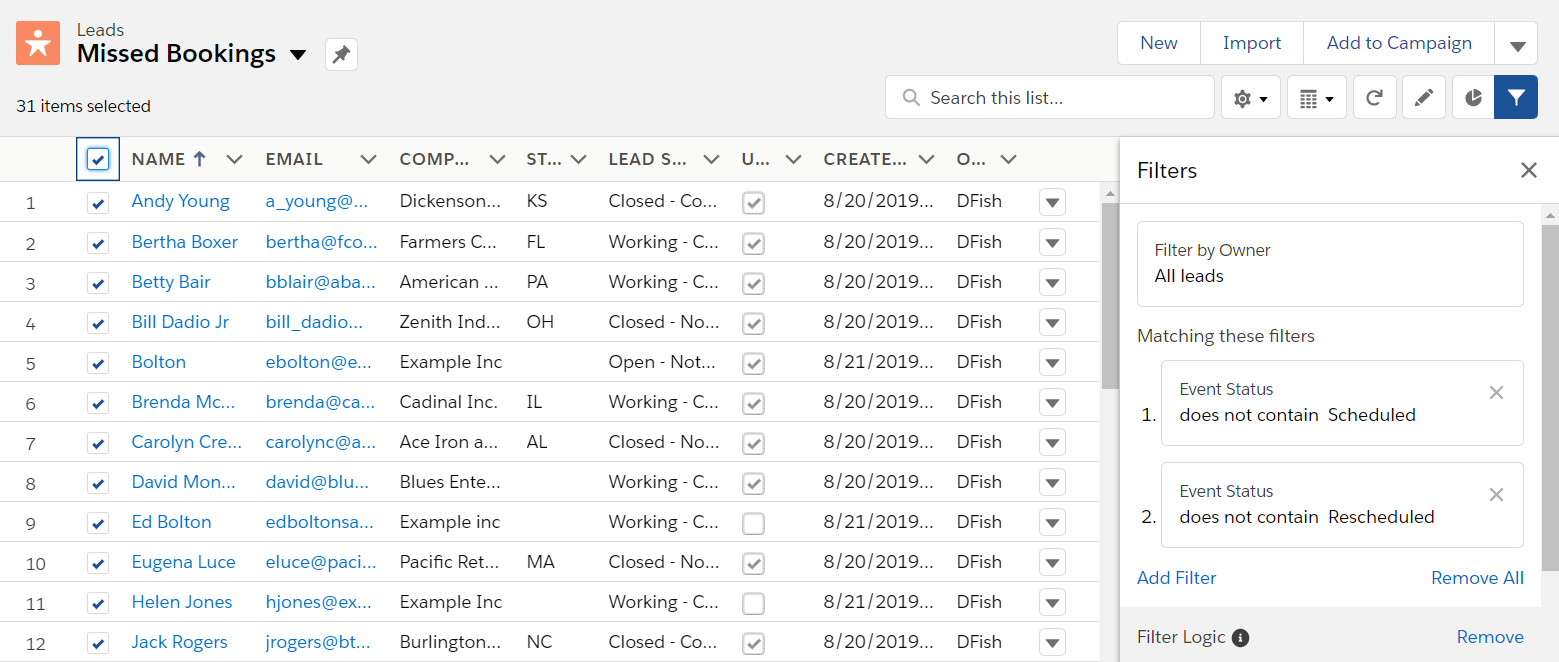 Figure 10: Select Members
- In the Add to Campaign pop-up, select the campaign you created (Figure 11).
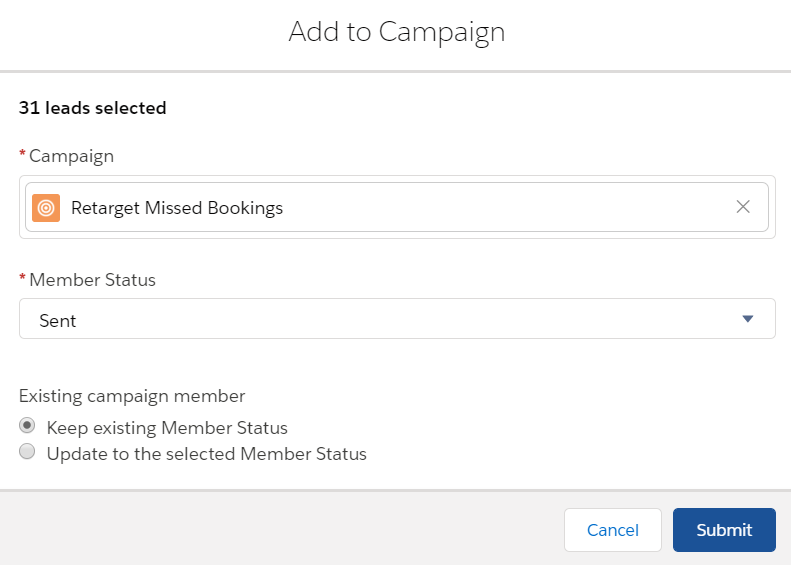 Figure 11: Add to Campaign pop-up
- Click Submit.
- Run your initial marketing campaign and make sure to monitor your Retarget Missed Bookings campaign.


NoteYou should retarget leads that didn't make a booking multiple times to continuously maximize your booking rates.