Your account is where you can find the settings to control all of your key dealings with OnceHub, like adding users and user licenses, updating your security policies, managing your billing, and more. Read on to learn about the settings available for you in this section.
Account settings
Welcome to your OnceHub account!
To access your account, click on the gear icon in the top navigation menu.
Only Administrators have access to the following sections in the OnceHub Account settings section. You do not need an assigned product license to access this section. Learn more
Users
In the Users section, you can manage other users in your account. This includes:
- Adding new Users to your account
- Accessing and editing other User profiles
- Deleting Users from your account
- Assigning or unassigning User licenses
Teams
In the Teams section, you can create teams of OnceHub users. These teams can be assigned to field live calls, or be assigned to host scheduled meetings. You can assign managers to these teams who can handle some of their administrative load.
Alert center
The alert center allows you to create alerts which keep you updated on every step of the booking process. Read on for more information on how to set up an alert.
Contact fields
In the Contact fields section, review and add fields you can use with contacts.
CRM
In the CRM section, you can connect OnceHub to your CRM.
- Click here to find more about integrating with Salesforce
- Click here to find more about integrating with Infusionsoft
API & Webhooks
In the API & Webhooks section, you can generate and copy an API key to use with our API.
Billing
In the Billing section, you can:
- Review and add assigned licenses for Users
- View your SMS credits and SMS log
- Review your payment methods
- Add and adjust notifications your account admins receive about your OnceHub account
- View and download transactional invoices
Security and compliance
In the Security and Compliance sections, you can manage:
- Password policies - including settings for Password length, Password complexity, Password expiration, and Password history.
- Account lockout policies - you can enable or disable account lockout and set the number of unsuccessful login attempts allowed before account lockout occurs.
- Session policies - you can enable or disable session timeout and manage the session timeout period.
- Provide OnceHub with the contact information of your Data Protection Officer and your European Union representative.
- Describe your processing of personal data in OnceHub as required by the GDPR. Learn more about maintaining records of processing in your OnceHub account
- Provide an email contact for data breach notification. In the event of a data breach, we always notify you via the email addresses of your account administrator and Data Protection or Privacy Officer. If there is anyone else you want us to notify, you can enter up to five email addresses here.
- Manage your Email from your domain settings. These settings allow you to control the email address that communications to your customer are sent from.
Settings and permissions
In the Settings and permissions section, you can:
- Delete your account (more information in following section)
- Specify a Compliance BCC email - this will allow you to automatically forward a hidden copy of all outgoing customer email notifications to a designated email address.
- Enter your partner referral code
- Remove OnceHub branding on customer-facing pages
- Allow Member users to create and update chatbots, forms, and pages
Note Admins can update all chatbots and forms. Members can only update those an admin assigned to them
Chatbot and form privacy
In the Chatbot and form privacy section, you can define the privacy and cookie policies related to visitors who encounter your chatbots and forms.
Compliance BCC emails
OnceHub gives you the ability to automatically forward a hidden copy of all outgoing Customer email and SMS notifications to a designated email address. This feature is especially important for organizations who are required to evaluate all sent messages for compliance purposes.
Setting up Compliance BCC email
In order to set up a Compliance BCC email, it is necessary for you to already have your own BCC email address set up and accepting emails.
To add a BCC email address to your OnceHub account:
- Sign in to your OnceHub account.
- In the top navigation menu, click the gear icon → Settings → Compliance BCC emails.
- Enter the relevant email address in the Compliance BCC emails field (Figure 1).
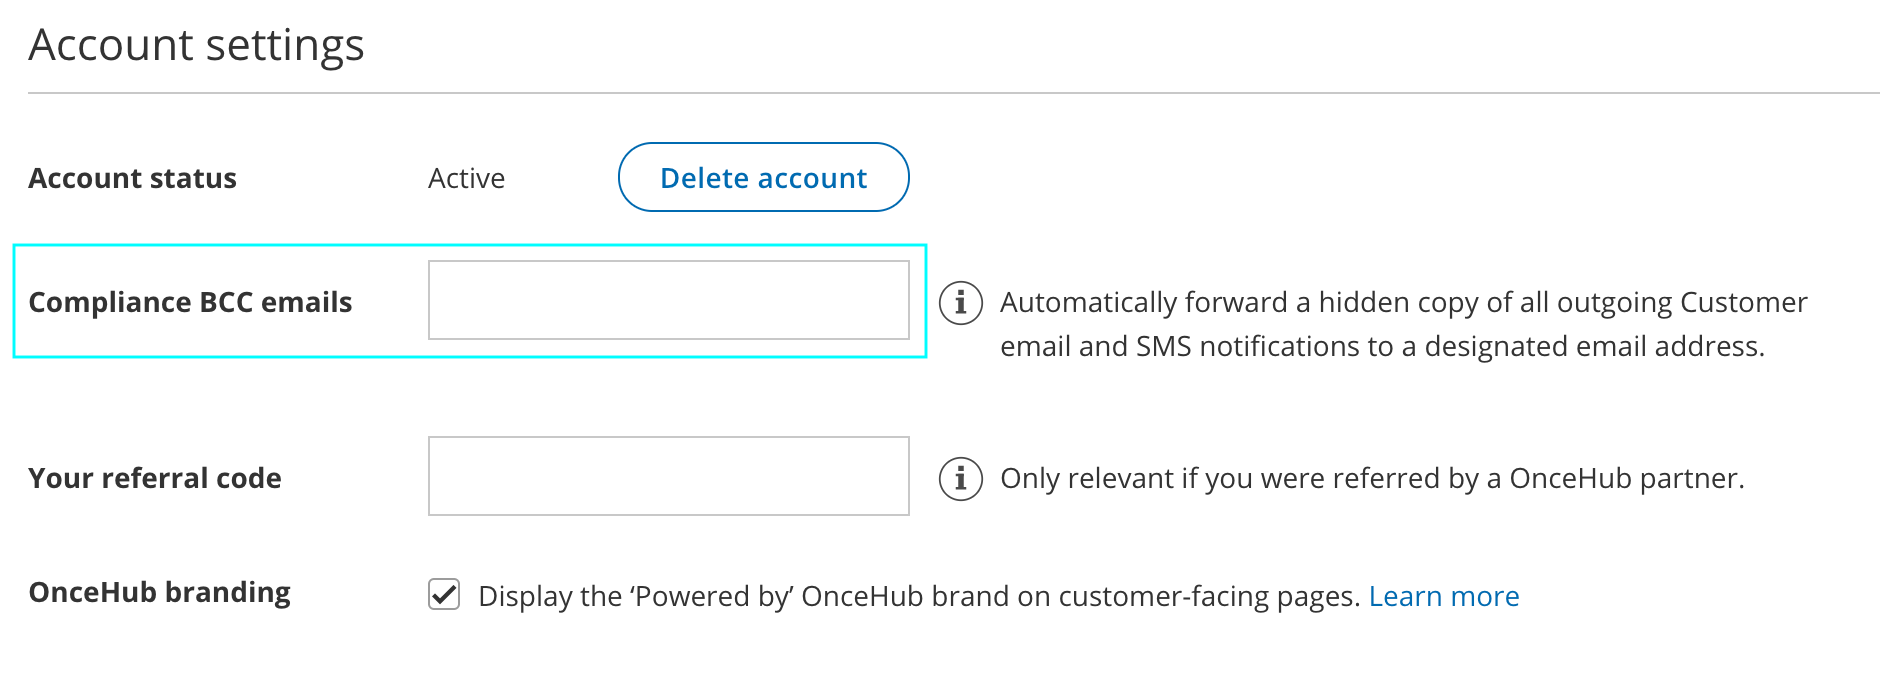
- Enter your BCC email address and click Save.

We recommend creating a test booking and sending a test email to yourself to ensure that the BCC address is accepting emails as expected.
Once set up, all customer notifications, whether email or SMS notifications, will be Bcc'd to your designated email address.
Creating and managing teams
You can group users together into a team, allowing you to easily assign multiple users to host meetings and so offering more availability to your customers. Based on rules which you set, meetings can be distributed among team members equitably, or favoring availability offered to customers.
You can assign a team manager to a team, who is able to act as similarly to an administrator for the members of their team.
For more specific details on what team managers can and can't do, see here.
To create a team:
- Go to your account settings (the gear icon at the top right), then go to Teams.
- If you have any existing teams in the account, you will see them here. To create a new team, click the Add team button at the top right.
- Name your team, and from the Users dropdown menu, select the team's members, then Add (Figure 1)
- That's it! You can now assign a team to host meetings.
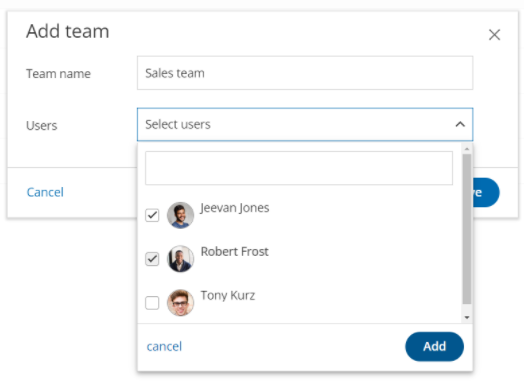 Figure 1: Creating a team and adding team members.
To edit a team:
- Go to your account settings (the gear icon at the top right), then go to Teams.
- In the lobby, click the three-dot menu for the team you want to edit, and click View/Edit team.
- Here, you can rename the team, add new users to the team by selecting them from the drop-down menu, or remove users from the team by clicking the X next to their name.
- Click Save when you're finished to save any changes you have made.
Using a team manager
The team manager plays a role somewhere in between an administrator and member: They have access to most functionalities in the account, with restricted access to sensitive areas like customer data. Once they are assigned a team, they can create scheduling pages on behalf of their team members, as well as edit aspects of their team members' profile and scheduling settings. Team managers can manage multiple teams, and teams can have multiple managers.
To assign a team manager to a team:
- Click the gear icon in the top right corner and select Users
- Here you can see all the users on your account, and their member type under the Role column.
- Click the user whose status will be changed
- Click the three-dot menu next to Role → Edit role
- From the Role drop-down menu, select Team manager.
- From the Team/s menu, click the checkbox next to the team/s you want this user to be the manager of.
- Click Apply to finalize your settings.
That user is now able to manage the team/s they have been assigned to!
How can I use team managers?
Let's say you have three different sales teams in your organization, and you want each to be managed by a lead member. You also want your head of sales to oversee and administrate all of these teams. You can achieve this by:
- Assigning your head of sales as a team manager to all of these sales teams, by selecting all of the sales teams from the Team/s dropdown as described above.
- Assigning each lead member to be the team manager of their own team, by selecting just their team from the Team/s dropdown as described above.
The head of sales will now be able to manage all the members of all the teams, while the lead member will only be able to manage their own team.
Alert center
Note Only administrators are able to create alerts, but a member user can be added as a recipient of any global alert.
Learn more about the differences between administrators and member users.
Alerts are a feature which enable the administrator, and any users they add, to be CC'ed into notification emails about bookings made, canceled, or rescheduled with any users and/or scheduling tools in the account. The email will contain all the relevant information about the meeting.
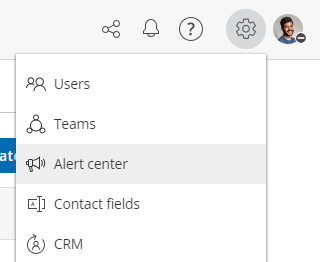
The alerts builder can be found under account settings (the gear icon in the top right-hand corner).
 The Alerts center
To create a new global alert:
- Click the Create new alert button.
- Select an Event which triggers the alert. These can be:
- Booking received
- Booking canceled
- Booking rescheduled
- Select a Scope. This is the user, booking page, or booking calendar which will be the subject of the alert.
- Depending on your choice above, click on the drop-down menu and select either a user, booking calendar, or booking page.
- Whenever a booking is received, canceled, or rescheduled with that user, booking page or booking calendar, a notification will be triggered.
- In the Notify section, select a Recipient from the drop-down menu. You can select multiple users as recipients. Alerts can be sent to any user in the account.
To edit, delete, or duplicate an existing global alert, click on the three-dot menu, and select the appropriate option.
Example of a custom alert:
In the example below, there is a configured custom alert. In this case, the alert will work as follows:
- When a booking is received/created in the booking calendar "Discovery call", the user "Jeevan Jones" will receive an email alert.
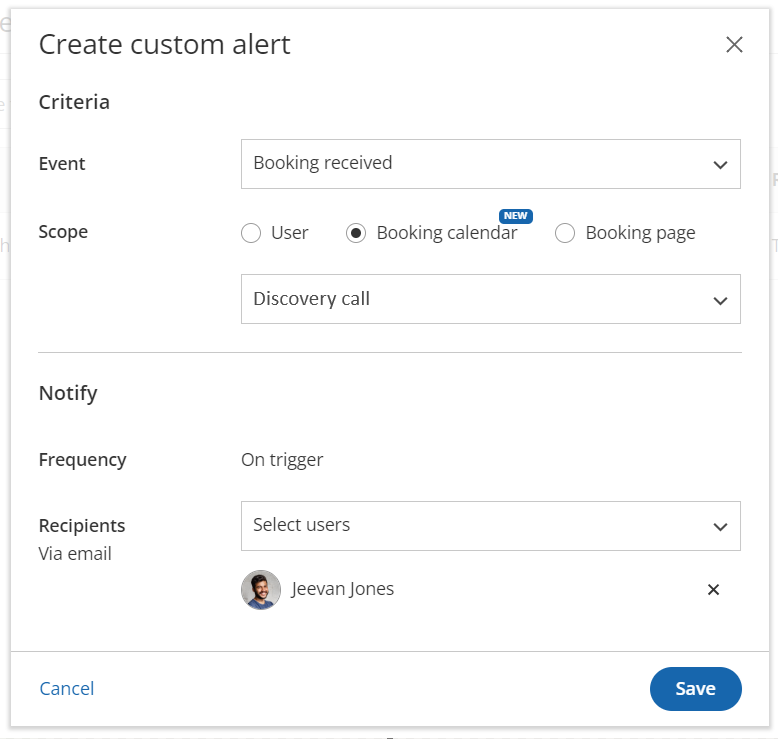 Creating a custom alert
NoteIf the user who has been scheduled with has turned off their email notifications for bookings received, canceled, or rescheduled, then users on the global alert will not receive any notifications either.
Notification center
The Notification center allows you to manage issues and warnings reported by OnceHub.
The Notification center can be accessed via the Notification icon in the top navigation bar (Figure 1). The number of pending notifications is indicated in red.
 Figure 1: Notification center
In this article, you will learn about the different notification types that you may receive in the Notification center. You will also learn about resolving issues reported in the Notification center, and about snoozing or dismissing notifications.
Notification types
There are two types of notifications in the Notification center.
Issue
An issue is an urgent matter that should be addressed immediately. When an Issue is detected, the Notification center automatically opens to grab your attention (Figure 2).

Figure 2: Issue example
Issue notifications include:
- Google Calendar connection error
- Microsoft 365 Calendar connection error
- Exchange/Outlook Calendar connection error
- iCloud Calendar connection error
- Salesforce API connection error
- Salesforce field validation error
- Infusionsoft connection error
- Zoom connection error
- GoToMeeting connection error
- Depleted SMS credit balance
Note
When a connection error for a third-party integration occurs, you cannot accept bookings and should resolve the connection error as soon as possible. Such connection errors can occur when the integration is not set up correctly or when an API access token was revoked or has expired.
Warning
A warning is a non-urgent matter that you should be aware of (Figure 3).

Figure 3: Warning example
Warning notifications include:
- GoToMeeting’s access token is about to expire
- Low SMS credit balance
Resolving a notification
To resolve an item in the Notification center, click the Resolve button. This takes you to the relevant section in the platform where you can address the reported item.
Snoozing a notification
Click Snooze to hide the notification for a period of 24 hours.
Dismissing a notification
Notifications regarding your SMS credit balance have a Dismiss link. Clicking Dismiss hides the notification from the Notification center until the SMS credit balance is low or depleted again.
Signing up for a OnceHub account
To create a new OnceHub account:
1. Open the OnceHub sign up page and input your name, email address, and password.
2. Click Sign up.
Which email address can I sign up with?
You can create a OnceHub ID with any authentic email address and a password of your choice.
You can also create a OnceHub account using G Suite by installing the OnceHub app from G Suite Marketplace. Once installed, any User on your G Suite domain can create the first User. That User will become the first Administrator on the account, and all additional Users on the domain must be invited by the Administrator.
Can I change my email address after I sign up?
Yes, you can do so in your profile, accessed via the left navigation menu.
If you are using OnceHub with a G Suite ID, your email address is your G Suite ID and therefore can only be changed via your G Suite account.
Learn more about how your sign-in credentials are stored and protected by OnceHub
Accessing your account
Note
Invited Users need to sign in for the first time by clicking the Sign in to your account button in the email invitation from the OnceHub Administrator of the account. Learn more about joining your organization's OnceHub Account
Sign in for Users with a OnceHub password
- Open the OnceHub sign-in page.
- Enter your Email ID and Password and click Sign in (Figure 1).Figure 1: Sign in to OnceHub
- You will be authenticated using our secure authentication system, and redirected to the OnceHub Start page.
Note
If you have enabled two-factor authentication for your profile, your sign in process will include an additional step. Learn more about signing in with two-factor authentication in this article.
- From the Activity stream, you can review your activities. You can also navigate to OnceHub, Chatbots, or your OnceHub Account settings by selecting an option from the top navigation menu.
Sign in for G Suite Users
If you have installed OnceHub using G Suite, you can access your account in two ways:
- Signing in from your G Suite account: you can sign in from within your G Suite account via G Suite Apps using Google’s secure single sign-on.
- Signing in from the OnceHub sign-in page: you can also access your OnceHub account by clicking the Sign in with G Suite button at the bottom of the OnceHub sign-in page.
If you use G Suite and your OnceHub administrator did not install OnceHub through the G Suite Marketplace, it's possible they either want you to sign in with a OnceHub password (see above) or configured OnceHub so that you sign in through SSO (see below).
Sign in through SSO
If your Administrator has configured SSO for your account, you can sign into OnceHub by clicking the Sign in with SSO link at the bottom of the OnceHub sign-in page.
You will be redirected to your Identity Provider and, once authenticated, will be returned to your signed-in OnceHub account.
Learn more about configuring SSO for your account
If you're having difficulty signing in, please don't hesitate to contact us for more help.
Signing in with two-factor authentication
Two-factor authentication adds an extra layer of security to your account. When you enable two-factor authentication for your profile, you’ll sign in to your account in two steps using your OnceHub account password and a unique verification code sent to your mobile phone. Learn more about how your sign-in credentials are stored and protected by OnceHub
Read on to learn about signing in to your account when two-factor authentication is enabled.
Signing in to your account
- Sign in to your OnceHub account as usual, using your email ID and OnceHub password.
- A unique verification code is sent to your mobile phone. If you do not receive a code, click Resend code.
- On the Verification page (Figure 1), enter the verification code you just received and click Sign in.
- If the verification code is correct, you will be signed in to your OnceHub Account.
Note
Two-factor authentication has a built-in lockout policy to detect irregular activity. If any irregular sign-in activity is detected, your account will be locked. If your account is locked, contact your account Administrator to unlock it.
Deleting your account
You can delete your OnceHub Account at any time in the Account settings section of your OnceHub Account. Once your account is deleted, you will no longer be billed.
An alternative to deleting your account is to pause your subscription by removing all of your seats. You can remove seats at any time. When you remove seats, they are still available for use in the application until the end of your current billing cycle. This is because you've already paid for all of your seats in advance at the beginning of the current billing cycle. If you remove all of your seats, you will pause your subscription. This will limit your access to OnceHub functionalities. You can resume your subscription and access at any times by adding seats.
Read on to learn about the effects of deleting your account and how to delete your account.
What happens when I delete my OnceHub Account?
- When you delete your OnceHub Account, you are deleting all products linked to your account. Your data, meetings, and inbound pages will be permanently deleted for both OnceHub and Chatbots. Any credit cards used to make a purchase, as well as associated personal data, are permanently deleted.
- If there are multiple Users on the account, all Users will be permanently deleted when you delete your account. If you (or another User) sign in again with the same ID after the account is deleted, the system will treat you as a new User.
- Deleting your OnceHub Account will not affect the scheduled meetings in your calendar.
- Once your OnceHub Account is deleted, you will no longer be billed.
Once you delete your account, it cannot be recovered or re-activated. If you are not 100% sure that you want to delete your account, please contact us before you delete.
Important
If you only want your Booking page or Master page to become unavailable, you can simply disable it and there is no need to delete your account. Learn how to disable your Booking page
Requirements
To access the Account settings page and delete your account, you must be a OnceHub Administrator.
Deleting your account
- Sign in to your OnceHub Account.
- In the top navigation menu, click on the gear icon → Settings.
- Click Delete account.
- In the Delete account pop-up (Figure 1), check the box marked I want to delete my account. I understand this cannot be undone.
Figure 1: Delete account pop-up - feedback box - Click Delete account to delete your account.
Once your account has been deleted, you will be redirected to the OnceHub pricing page to see our latest plans and pricing should you wish to create a new account.
How to remove OnceHub branding on customer-facing elements
OnceHub is highly customizable, providing you with advanced branding tools that allow you to make our products a part of your organization's environment. If you have customized your page, email, and other customer-facing elements, we take a hands-off approach with our own branding and ensure yours is front and center.
Specific cases
In the following scenarios, we do not show our own branding:
- Using a custom theme: No branding the left pane of the relevant Booking page or Master page
- Using email from your domain: No branding on customer notification emails
- Using custom notification template: No branding on relevant customer notification emails
OnceHub branding added by default
If you have not customized these elements, we add a small bit of text by default, such as the text, "Powered by OnceHub," on a Booking page or customer notification email.
However, if you prefer not to display this text, it can be toggled off easily in your OnceHub account Settings section.
Simply uncheck the OnceHub branding box and this text will be removed from all customer-facing elements for future interactions.
Note
To remove OnceHub branding, you may need to upgrade your plan.
Specific cases
In certain scenarios, branding is removed by default:
- Using a custom theme: Branding removed from the left pane of the relevant Booking page or Master page
- Using email from your domain: Branding removed on customer notification emails
- Using custom notification template: Branding removed on relevant customer notification emails
OnceHub for Google Workspace
OnceHub for Google Workspace is designed specifically for organizations using Google Workspace. Its special features are the single sign-on with the user's Google Workspace account, and the automatic connection to the user's Google Calendar.
OnceHub for Google Workspace is only available to organizations running Google Workspace, and can only be installed from Google Workspace Marketplace by the organization's Google Workspace Administrator.
Once installed, any user on the domain can create the first OnceHub account. That account will become the first administration account and all users will be added from that account only. Learn about adding Users
When the first Administration account is created, any User on the domain who tries to create an account without receiving an invitation from the Administration account, will be instructed to ask the Administrator to add them as a User.
Once Users are added and have signed up, they can simply access OnceHub from their Google universal navigation bar or with the Google login for OnceHub.
OnceHub for Google Workspace uses Google’s single sign-on, so it is as secure as your Google Workspace account. If you’re already logged into Google, no login is required to access the OnceHub platform.
To install OnceHub for Google Workspace, ask your Google Workspace Administrator to visit our OnceHub listing in the Google Workspace Marketplace.