This article is a step-by-step guide to help you get started with chatbots, from building a chatbot from scratch, to publishing it on your website and gaining new contacts easily!
How chatbots work
You can use chatbots for many things, but we think the best and most effective way to use chatbots are to engage with visitors, asking questions that qualify them to schedule meetings with your team or chat with them further.
After answering some questions, their answers determine whether they’re offered a time to schedule with your team or the opportunity to chat live with them.
We understand that personalization leads to better engagement in your visitors' experience. You can create a different chatbot for each experience your visitors may have, according to their needs and your business objectives. You can also create one chatbot with multiple paths, taking your visitors through the best interactions for them with conditional routing.
This allows you to customize their experience seamlessly, providing the most effective messaging for that specific audience under the given circumstances. It also raises the likelihood of identifying the right prospects for your team to engage with as high-quality leads.
Building a chatbot
Step 1: Create your chatbot
You can create as many chatbots as you like for different pages on your website. Read through the steps below to learn how to build a chatbot.
See how to create a chatbot
You can access your chatbot builder by clicking the Chatbots icon on the left.
Here, you'll find the lobby, where you can create new and manage existing chatbots. You can search through your existing chatbots by typing the name of the chatbot (or, if you're an account administrator, the owner's name) in the search box, or by using the chatbot's share link, which you can see under an existing chatbot's title.
Start from scratch: You'll start building your chatbot with a blank canvas.
Use a template: Choose chatbot one of our many, ready-made templates. The correct template saves time by providing an example chatbot you'll adjust according to preference.
Duplicate an existing chatbot: If an already-existing chatbot is similar to what you're wanting, you can duplicate that chatbot and tweak it to suit your preferences. Click the three dots on the right-hand side of that specific chatbot and select Duplicate.
Read on to learn more about building a conversation
Step 2: Creating a conversation
A chatbot's building blocks are 'interactions'. The way you order and route these interactions (which we'll teach you about in this article) shapes the type of conversation your visitors will have with the chatbot.
These can be dragged and dropped from the Add interaction panel on the right of the chatbot builder. Their position in the builder, or their routing, will determine the order in which they appear to a customer.
Learn how to create a conversation
Drag and drop interactions into the chatbot's column in the order you want them to appear to your visitors.
 Figure 1: Add an interaction to your chatbot builder
Interactions can be questions, messages, or actions, including offering scheduling to your visitor.
You have many interaction options for your chatbot, allowing you to:
- Ask questions to qualify visitors
- Send follow-up questions depending on their answer, to personalize the experience further
- Offer scheduling or live chat to qualified visitors, based on their answers
Conversations are divided into three areas in the builder: The welcome message, the consent agreement, and the conversation flow.
Welcome message
The Welcome message interaction is the first your visitor will see from you. It grabs their attention and prompts their engagement. When they click on an answer, your widget opens fully so your chatbot can engage in a conversation with them.
- Can include up to two interactions.
- Can pop up on the visitor's screen, grabbing their attention.
- Can only be Message or Question interactions.
To build your welcome message interaction, drag and drop an interaction from the Add interaction section.
Consent agreement
Some regions, such as the EU, require you to gain consent before using a visitor's personal information.
To keep things simple, OnceHub provides default text you can use to request their consent. Simply toggle the consent agreement on or off depending on your needs.
 Figure 3: Consent agreement
Learn more about collecting consent for processing under the GDPR
You can customize your consent messaging by going to your Account (the gear icon) and selecting Visitor consent & cookies.
 Figure 4: Customize your privacy messaging
Conversation flow
You can drag and drop the rest of your conversation's interactions into your conversation from the Add interaction section on the right (if you click an interaction, it will join at the bottom of the conversation). They will be routed according to the rules you configure (see step 3 below).
Interaction options
Question types
Questions require the visitor to respond before continuing the conversation.
You can choose from various question field types:
- Single select: Multiple answer options. The visitor can only select one answer.
- Text question: Let the visitor answer in their own words
- Email: Request the visitor's email address
- Number: The question has a numerical answer. You can define a minimum and maximum amount.
- Phone: Request the visitor's phone number.
- Multi select: Multiple answer options. The visitor may select one or multiple answers.
- Date & time: The question has a date and time (both) for an answer. Optional: Require the date and time to be in the future.
- Date: The question has a date for an answer (for example: a birth date).
- Time: The question has a time for an answer.
Chatbot responses
Each question can have a defined chatbot response after your customer responds, keeping the conversation collaborative and relevant to their answers.
When using the single select or multi select fields, each possible answer can have a unique chatbot response.
 Figure 6: Chatbot responses
Messages
Messages help you keep your interactions conversational, preventing the visitor from feeling like they're filling out a form. Effectively used message interactions raise the visitor's engagement in the conversation.
You can include various messages in your conversation:
- Text message: Inform the visitor of something in a text message interaction, without requiring an answer to continue. For example, you can provide information you've determined is relevant to them, based on their responses to previous questions.
- URL: A URL with preview image, prompting them to visit a specific website.
- Image: Display an image.
- Video: Upload a video they can watch inside the chatbot widget.
- Document: Upload a document they can download from the chatbot widget.
Actions
- Schedule via booking calendar: Offer them to schedule with you through a booking calendar, without leaving the chat widget. You can offer scheduling to everyone or only route qualified visitors to this action.
- Instant call: A request for an instant call will be sent to all Users with a live engagement license. If no User responds, the bot conversation will continue.
- Schedule via booking page: Offer them to schedule with you through a booking page, without leaving the chat widget. You can offer scheduling to everyone or only route qualified visitors to this action.
- Live chat: Offer to chat live with your visitor. The chatbot will connect them with a member of your team to chat one-on-one and answer their questions or move them to the next step in the sales process.
- AI conversation: This interaction hands off the conversation to our AI-powered bot.
- Contact status: Indicate a status (Qualified, Marketing qualified, Sales qualified, or Disqualified) for the contact so you can set other processes in motion on your end based on that status. You can also use this data to optimize your chatbot flow, determining the efficiency of your campaigns.
- Email alert: Send an internal email alert, invisible to your visitor, when they reach a specific part of the conversation. You can alert people on your team about qualified visitors who answer in a specific way.
- Chat rating: Ask the visitor to rate their experience. They can choose between one and five stars, from poor to excellent.
- End chat: End the chat completely. Your chatbot will not send any more interactions for this conversation. You cannot route the End action to another interaction.
Ending the conversation
When you're ready to end the conversation, we always recommend using the End chat action. If you do not use this action, the conversation will end abruptly after it reaches its final interaction. Remember, you cannot route the End chat action to another interaction.
The right farewell message will keep your visitor's experience courteous and enjoyable.
Step 3: Routing your interactions
You can route your interactions by choosing conditions and deciding which interaction they should see next.
You can get really specific about the routing logic you want. The logic can depend on how your visitor answers the current question or a previous one. You can also base the logic on a contact field already saved to their contact record (for instance, the Company size field).
Learn how to route your interactions
You can route your interactions by choosing conditions and deciding what your visitors should see next. Either create your next interaction as you route to it OR route to an interaction you've already created.
How can routing be used?
Qualify a website visitor during the conversation
To keep your team working efficiently, you may not want to meet with every website visitor, but may place high value on scheduling a meeting with qualified visitors. You can ask targeted questions in your chatbot's conversation, routing them either to interactions that do not offer scheduling if you determine this is suitable, or to a scheduling or live chat interaction if they do qualify to meet with your team, based on your criteria.
Set the path for the conversation
You can provide the most optimal conversation for a specific website visitor by routing them to the right interactions. This can be based on the options the website visitor selected in a previous or current interaction, or based on information you may already have about them.
You can route to the next interaction in three different ways:
- Route to the next interaction in the order
- Always route to specific interaction
- Route to interactions based on rules
- Route based on this interaction's answer
- Route based on a previous answer
- Route based on live chat agent availability
- Route based on a contact field (for example, their company or team size)
Read on to learn how each routing style works.
 Figure 1: Route to interactions based on rules
You can access your routing by selecting a specific interaction and clicking on the routing tab.
 Figure 2: The Routing tab
Route to the next interaction in the order
Select this option if you want the visitor to see the next interaction in the chatbot builder. Remember to click Save at the bottom of the panel.
Always route to specific interaction
If you always want your visitor to see a specific interaction next, no matter the audience's answer:
- Choose Always route to specific interaction.
- From the drop-down menu, select the interaction you want your visitor to see next.
- Click Save at the bottom of the panel.
Route to interactions based on rules
If you'd rather send your visitors down one interaction path if they answer a question a certain way, or another path if they answer differently, select Route to interactions based on rules. You can add as many rules, or conditions to one rule, as you need to help refine the routing experience,
If your visitor's next interaction should be based on how they answer the current question:
- From the If drop-down menu, select This answer
- Select a variable (is; is not; etc.)
- Choose which answer is relevant
- From the Then route to drop-down menu, select the interaction they should see next based on your rules.
If you like, you can route to a different interaction for every possible answer provided.
Note that this option is only available in question interactions.
If your next interaction should be based on how they answered a previous question:
- From the If drop-down menu, select Previous answer
- From the drop-down menu, select the relevant previous answer.
- Select a variable (is; is any of; has any value; does not have a value)
- From the Then route to drop-down menu, select the next interaction your visitor will see.
Live chat
You can route to live chat with your chatbot based on the availability of the live chat agents on your team.
If you want your high-quality leads to get in touch with you as possible, live chat can provide the experience your visitors desire while reducing your time to engagement. Read the next step for more details on how to use live chat.
Contact field
If this visitor already had a conversation with your chatbot on a previous visit, you may have saved contact fields from it. You can route to the next interaction based on that saved contact field.
- In the routing tab, select Route to interactions based on rules
- From the If drop-down menu, select Contact field
- Choose a contact field, then a value.
- If you want to use more than one contact field, click Add condition
- From the Then route to drop-down menu, select the interaction you want the visitor to see next.
The routing map
At any time, you can use the routing map to visualize the routing paths that you have created. Near the top of the chatbot builder, click Routing map to see a visual representation of all the interactions in the chatbot, and how they are connected to each other through routing.
You can click and drag individual interactions to re-arrange them. Illogical routing, such as an interaction that doesn't have any routing leading to it, will be highlighted with an error symbol, allowing you to make sure there are no issues in your routing.
Clicking on individual interactions allows you to set their routing, as described in the steps above.
Click Back to builder near the top of the routing map to leave.
Examples of routing scenarios
Offer to speak with them in live chat
If you want to get in touch with high-quality leads as soon as possible, live chat can provide the experience your visitors desire while reducing your time to engagement. Once you qualify visitors through the chatbot conversation, you can route them to a live chat action, where they will be asked if they'd like to chat live with a team member. This way, you can answer queries immediately from people seriously interested in your product.
You can make this routing dependent on a specific live chat team's availability, so it only suggests live chat when someone on that team is available for chat.
Company size
Based on a visitor's known company size, you can qualify visitors for scheduling.
If you want to schedule an appointment (sales discussion, demo, consultation, etc.) only with qualified visitors, you can ask targeted questions and route them to an interaction where they are offered to schedule with you.
If they don't meet your organization's qualifications for a scheduled appointment, you can instead route them to an alternative option (recorded demo, help center, etc.).
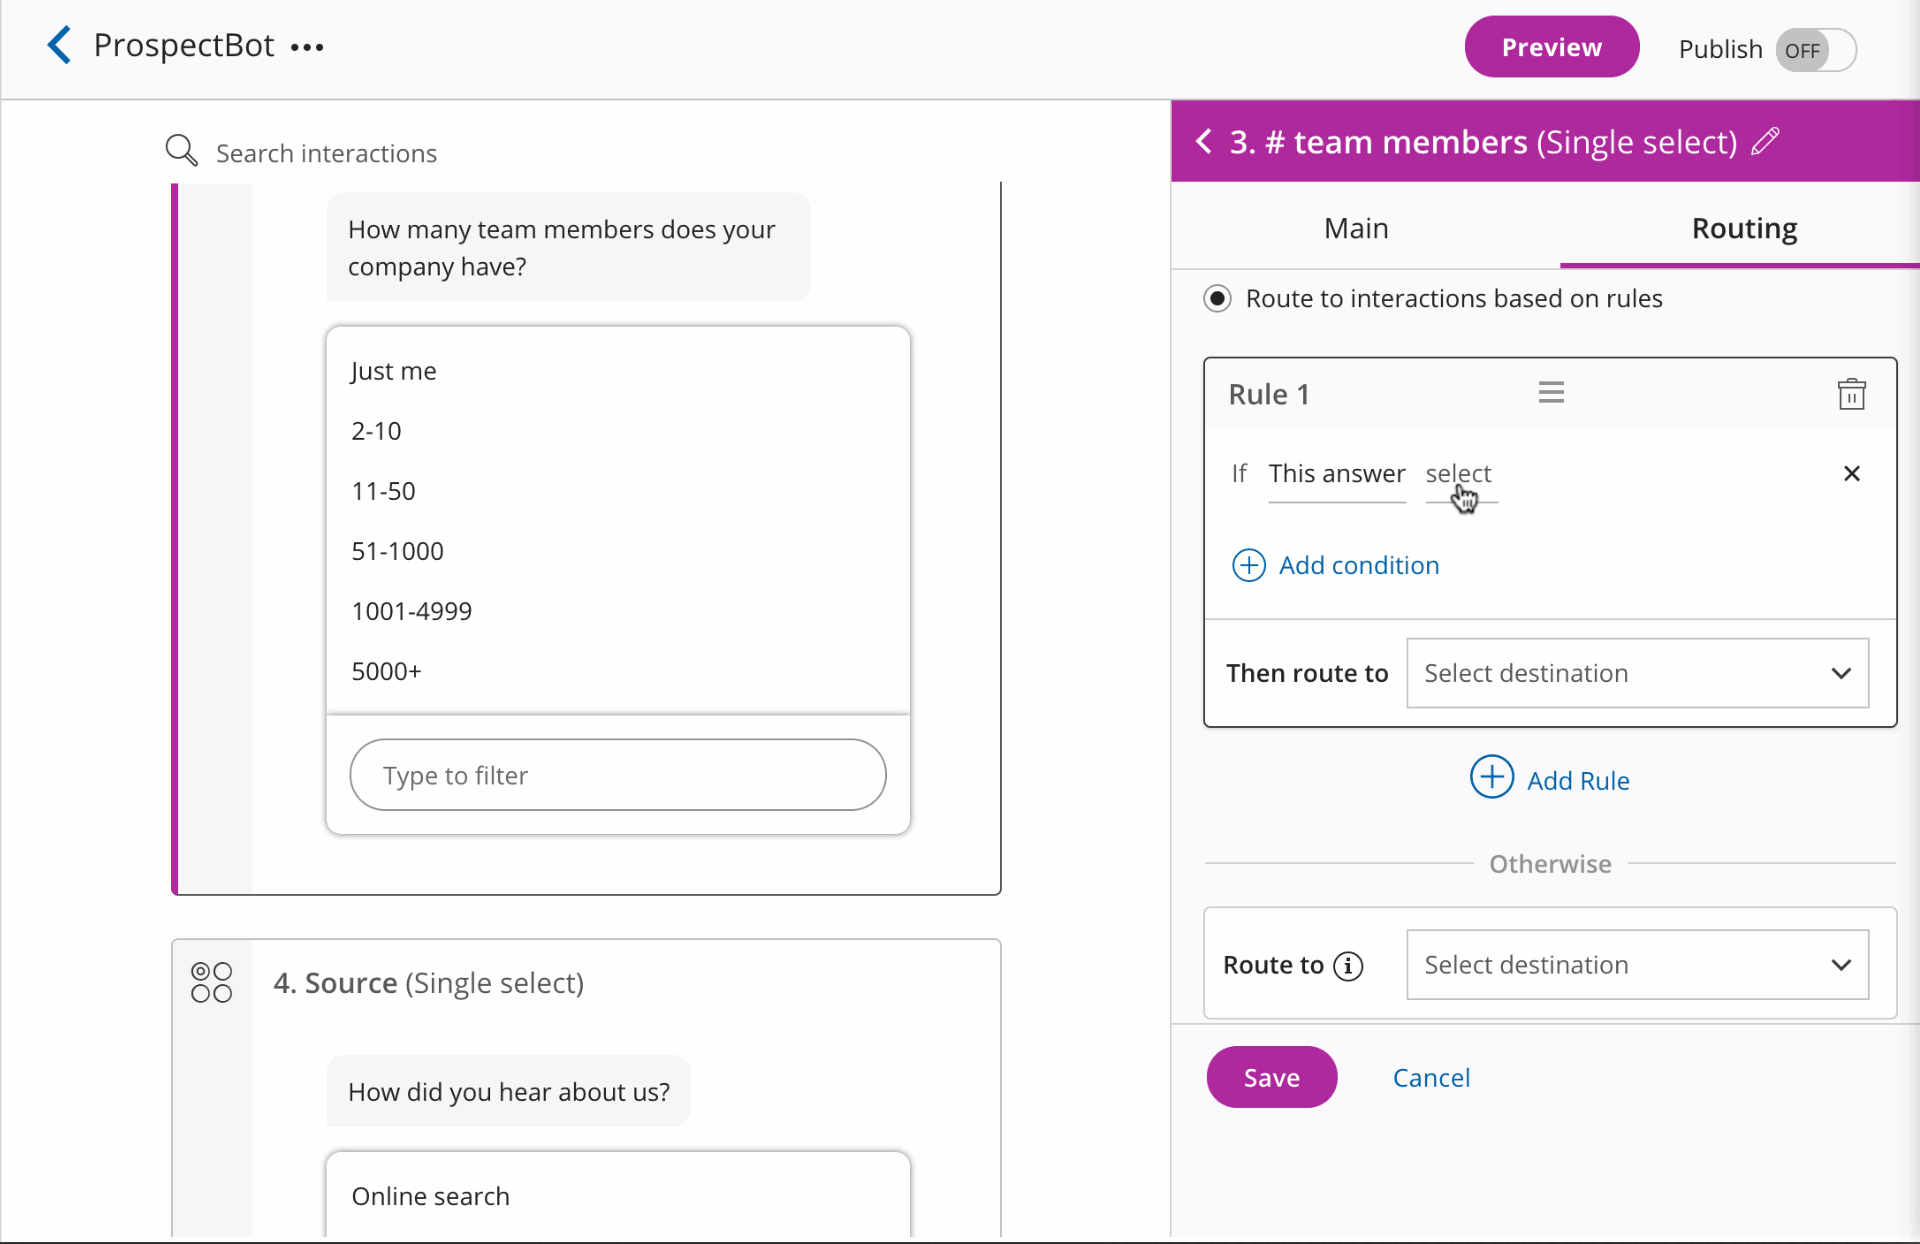 Figure 4: Offer scheduling to qualified visitors
Schedule with the right team
Perhaps your team distributes prospects through regional teams. In this case, you can detect their location and route them directly to schedule with the relevant regional team. This can be based on their country, state, national region, international region, or any other criteria you define.
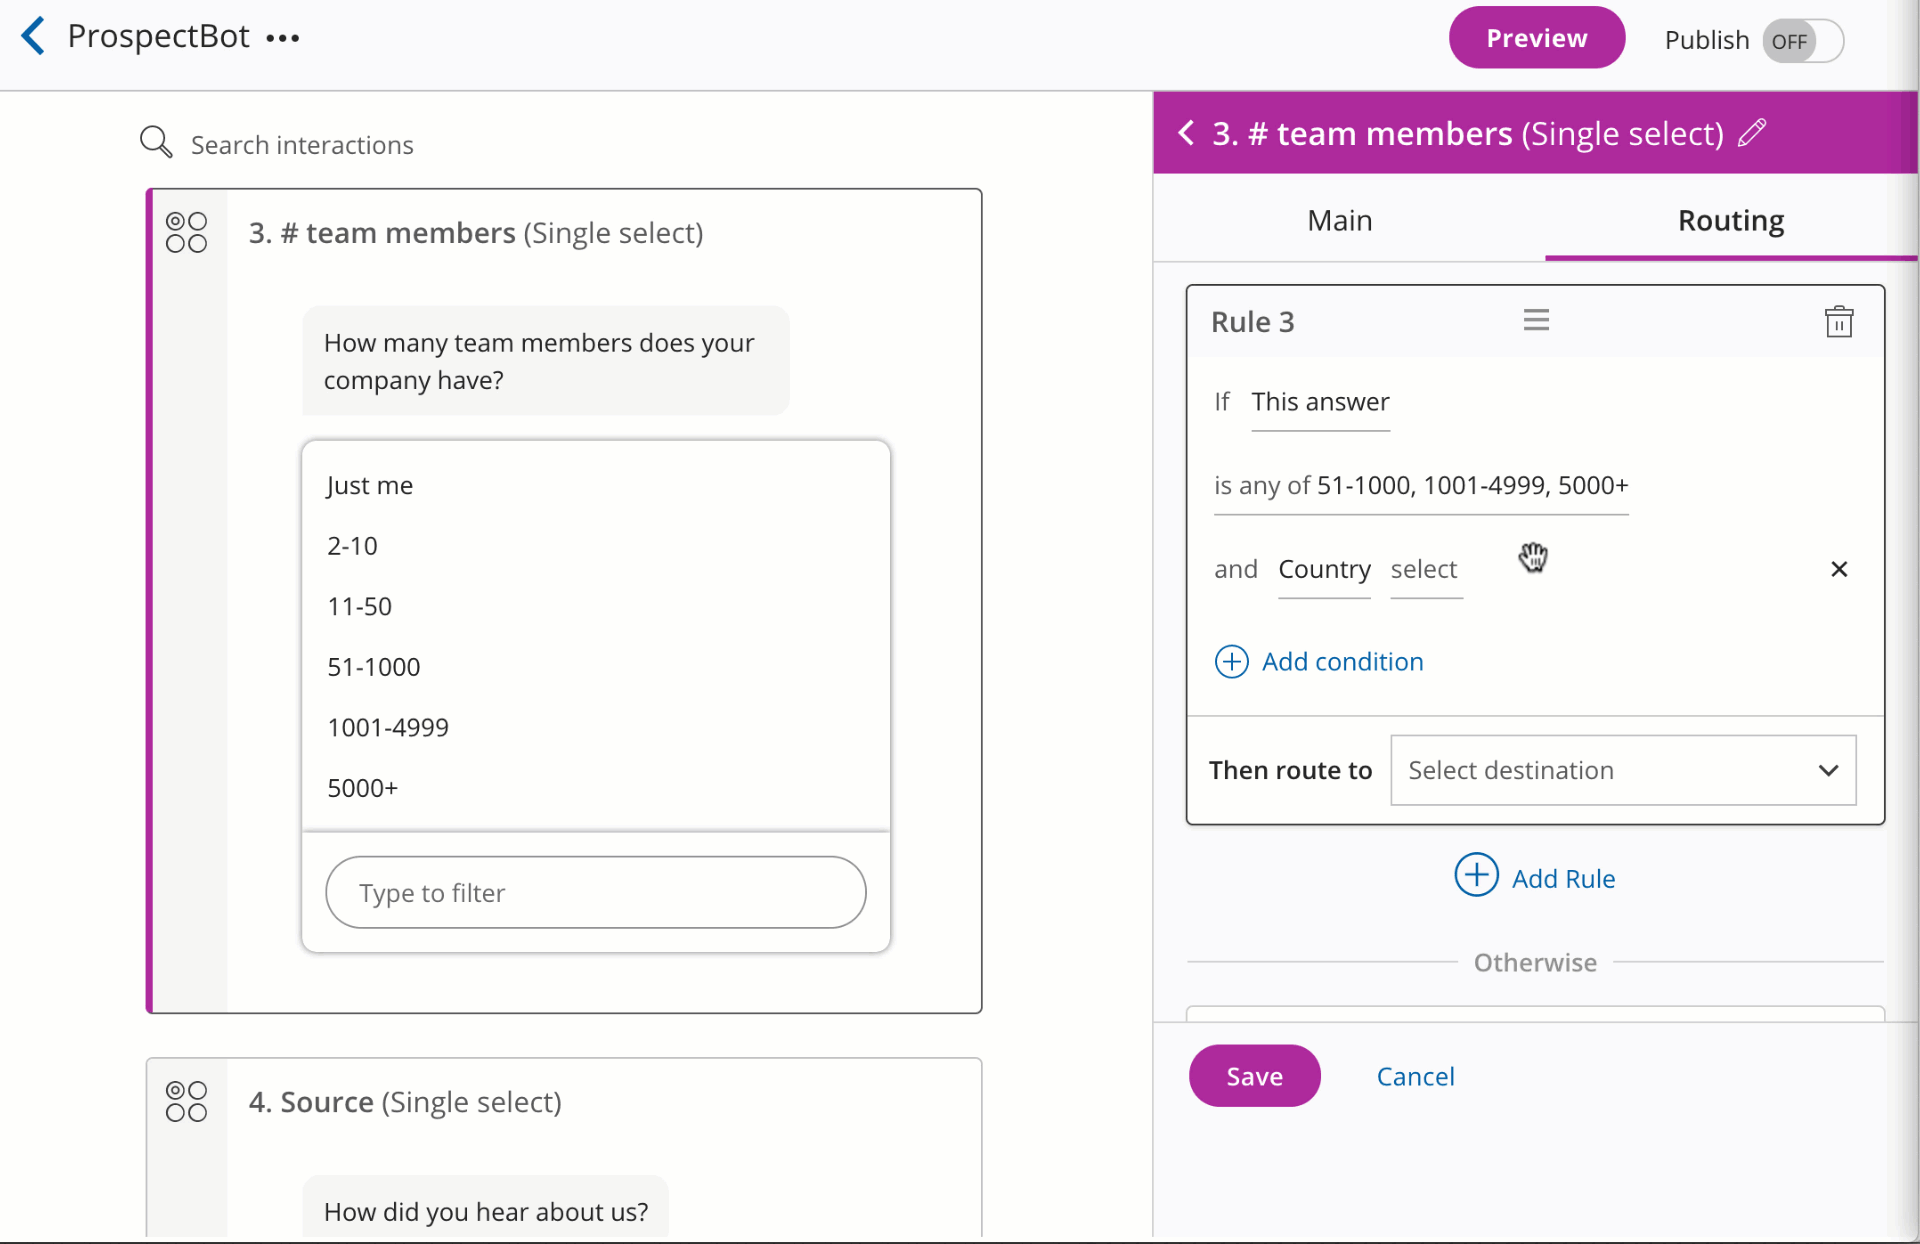 Figure 5: Schedule with a regional team
Send your team an internal email alert
You can add internal email notifications at any point in the conversation so the right people stay updated on your new lead and their engagement with you. The email alert action is 100% internal to your team. Your visitors will not see this interaction on their end and they will not receive any notifications from it.
Route to the email alert action at the right time in the conversation. This may be a critical qualification interaction, such as team size or a specific product they're interested in learning more about.
Route to different URLs
Depending on an answer, you may wish to provide your visitor with a URL to one site or another. For instance, if you'd like to promote an article published about your business, you can add a URL message linking to it.
Step 4: Offer scheduling with your chatbot
Your chatbot can identify the people your team should speak to further and offer scheduling to them. Once they qualify, route them to a Schedule interaction.
The entire scheduling experience takes place as they chat to the chatbot.
Learn how to offer scheduling
 Figure 3: Add scheduling to your conversation
Offer scheduling via booking calendar
To offer scheduling via a booking calendar:
- In the chatbot builder, add the interaction Schedule via booking calendar into the conversation flow
- Give it an internal label, and from the Select a booking calendar drop-down menu, select the booking calendar that you want your visitors to be routed to
- If you want to edit the prompts given to your customer, you can change the text under the headings Name, Email, Confirmation step.
- From the Routing tab on the right-hand panel, select the next step you want the customer to see once they have finished scheduling with the booking calendar.
- Once you're finished with your booking calendar settings, click Save.
- Remember to route to your booking calendar from the appropriate interaction (explained in step 3 above).
Offer scheduling via booking page
Below is a summary of how to add a schedule via booking page interaction to a chatbot, but you can find a more detailed article here.
- In the chatbot builder, add the interaction Schedule via booking page into the conversation flow
- Give it an internal label, and title, and from the drop-down menus, select:
- The event type
- The booking owner
- Additional team members
- Once you're finished with your booking page settings, click Save.
- Remember to route to your booking calendar from the appropriate interaction (explained in step 3 above), and from the Routing tab on the right-hand panel, select the next step you want the customer to see once they have finished scheduling with the booking page.
Live chat
Once you qualify visitors through the chatbot conversation, you can choose the right time to offer live chat to them. This way, people seriously interested in your product can ask questions to a real person, and move to the next level in your funnel.
The entire live chat experience takes place as they chat to the chatbot.
Below is a summary of how to add a live chat interaction to a chatbot, but you can find a dedicated live chat article here.
First, you will need to make a live chat interaction:
- In the Add interaction panel in the chatbot builder, add the Live chat interaction
- Add an internal label
- From the Broadcast to drop-down menu, choose a live chat team. (See here to create a team.)
- Add a webhook notification to alert team members to an incoming live chat request
- Edit the hand-off message if you want to
- Create timeout settings. These determine how the bot responds when no team member accepts a conversation request.
- Select a length for the timeout period
- Edit the timeout message if you want to
- If live chat times out with no response, the visitor will be asked to schedule a meeting.
Next, with a live chat interaction created, go to the interaction right before you want to switch to live chat:
- Select Route to interactions based on rules
- From the If drop-down menu, select Live chat team, then select the relevant live chat team
- Then select At least one agent online.
- From the Then route to drop-down menu, choose either your existing live chat interaction, or click Create new interaction and add one.
You should also specify in another rule: If Live chat has No agents online, that the chatbot should route them to another interaction, such as Schedule via booking calendar.
Step 5: Configure assignment for your team
Assigning users to a chatbot shares new contacts out among them. For example, if the chatbot is used as a way of creating new leads for the sales team, then the assignment settings will determine which members of your
Learn how to assign teams to a chatbot
In the Assign tab, you can assign new contacts to team members. This means they'll be the owner of that contact in their Activity stream.
From the Select user(s) drop-down, click the checkbox for each user that you want to share in the distribution of new contacts. Assigned users are displayed beneath the drop-down menu, and can be removed by clicking the X next to their name.
If an administrator has allowed member users to create and manage chatbots, members will be able to see any chatbots an administrator assigned to them. Turn this permission on or off by selecting the gear icon in the top right corner → Settings and permissions → Member permissions.
There are three options for distributing the conversation assignment:
- When assigning a conversation to a team member, you can select either a single user or multiple users.
- If you select multiple users on your team, OnceHub will assign the conversations based on round robin distribution.
- If you're offering scheduling in your conversation, you can also opt always to assign the conversation to the booking owner (the person receiving the booking). This will override the other team member selection(s) made on the Assign page. Click the checkbox next to Always assign new contacts to the booking owner on the Assign page to enable this setting.
If the visitor is new (based on email address provided), the assigned team member will be assigned as that contact's owner in OnceHub.
After assigning a conversation, it will show up under the assigned team member's My activity filter in the Activity stream.

Step 6: Preview your chatbot
Before you share it, you can preview your chatbot. This allows you to interact with your chatbot as a visitor would, allowing you to ensure that your interactions and routing are working as intended.
See how to preview your chatbot
To see a preview, click on the eye icon at any time as you're building your chatbot. You can preview everything as your audience would experience it.
Your chatbot will pop up, and you can answer the questions you have set just as your customer would. To start over, for instance, if you want to try out a different routing path, click Restart at the bottom of the pop-up.
To exit the preview, click the X at the bottom of the pop-up.

Step 7: Publish and share your chatbot
When you publish and share your chatbot, visitors will be able to interact with the chatbot and have a conversation.
Learn how to publish and share your chatbot
Once you're happy with your interactions and routing, you can publish your chatbot by toggling it on.
 Figure 6: Publish your chatbot
 Figure 7: Chatbot status - Published or unpublished

Share your chatbot
Depending on how you want to share your chatbot, click either the Share a link or Embed on website tab.
Sharing a link directs your customer to a webpage that hosts your chatbot, whereas embedding on a website allows you to host the chatbot on your own website.
Both options allow you to customize the chatbot as you like. Read this article for a more detailed tutorial on how to share your chatbot.
Managing your chatbots
Monitor your stats
You can monitor how your chatbots are performing in the chatbot lobby. Hover over the analytics icon in the Analytics column, where you will see a report of these statistics:
Conversations started - How many visitors engaged with the chatbot, replying one or more times.
Conversations completed - How many visitors either went through all the conversation's interactions or reached an End chat action, as designed for that chatbot.
Conversations abandoned - How many visitors engaged with the chatbot, replying one or more times, but did not complete the conversation.
Meetings booked - How many visitors booked a meeting.
Emails captured - How many visitors provided their email during the conversation. This could be gathered either through an Email interaction or as they book a meeting.
Receiving chat notifications
As you build your conversation, you may add questions or other interactions that are significant to someone on your team. For instance, the visitor reached a certain part of the conversation or answered a question with a specific answer that indicates they're qualified for further sales action on your end, even if they don't book with you during the conversation.
You can add internal email notifications at any point in the conversation, so the right people stay updated on your new lead and their engagement with you. The email alert action is 100% internal to your team. Your visitors will not see this interaction on their end and they will not receive any notifications from it.
1. Identify which interactions need an email notification.
This may be a critical qualification interaction, such as team size or a specific product they're interested in learning more about.
2. On the Routing tab, create routing logic to that email alert
For each relevant interaction, you can add a rule that routes the conversation to the email alert action. For instance, you can send an email whenever a visitor reaches that interaction in the conversation, or you can send it only if they answer a certain way.
3. Create the email alert action
You can create this action from the routing tab (Then route to +Create new interaction) on the previous step or simply create it by dragging a new email alert action into the conversation.
Be sure you route to the next step on the Routing tab so the visitor has a seamless experience.
More resources to help with chatbots
- Browse the chatbot articles: For those who like to read everything
- Integrate OnceHub with Zapier: Track your chatbot campaign effectiveness by sending triggered updates to a third-party app.
- Hire professional services: Our expert team members can help you configure everything quickly and correctly.